Tuesday, December 30, 2008

Coat Buttons

I finished my coat on Saturday night, except for the buttons and buttonholes. I had determined that I wanted to do hand buttonholes, and I'd tried to choose buttons some time ago with a swatch of fabric, but I just couldn't decide, and so I waited until I could take the coat with me to the button shops. I knew I wanted something rather unique, but which didn't take attention away from the entire garment, but complimented it. It was also hard to be sure of the right size until I could see them on the coat


Photo Link

I am very pleased and rather surprised with my choice. I actually had two of these buttons already, and had thought I liked them a lot with this. Of course I had no idea where I had found them, or even when I had bought them. Amazingly, there they were at Sew Creative, so I bought two more. I will have to get an extra next time I'm there, but I thought I had three at home, so only bought two more.

I think these look a little like Jules Verne flywheels or something. Very engineered, anyway. I also bought another set of buttons just in case, but these were definitely it.

I have 2 of the buttonholes done at this point, and will finish the final two tomorrow I hope. So far, I'm really pleased with the coat, and I can't wait to show it off in its completed state.

Thursday, December 25, 2008

Coat Progress 3


Photo Link

This is the collar edge, showing the hand topstitching I've been doing. I wanted it to look somewhat like saddle stitching, although it's kind of a hybrid between prickstitch and backstitch. I've done this around the pockets, flaps, collar and on both front edges. I used 2 strands of Mettler's Silk-finish Cotton thread.

Here is the way I did the stitching if you're interested. Pull out a very long length of thread, double it and thread your needle with both ends. Tie a knot in those two ends. This ensures that when you want to go back a stitch or two to correct things, as you will, you can just unthread your needle, pull out the stitching and re-thread.

I stitched right to left. Come up with your thread a stitch-length to the left of where you want to begin. Insert your needle to the right, at your desired starting point. Come up again a stitch length to the left of your first stitch. Continue this way until you're done. This allows for fairly long stitch lengths, which is what I wanted, while still doing the work of an edge stitch even though the stitch is long and fairly loose so that the stitching won't disappear in the pile of the fabric.

It's easy to keep your line straight by using your thread and needle as a guide. Make sure you've inserted your needle so that you're going straight before you push it all the way through and up again. Use a needle that's at least an inch and a half long for this so you can line it up with the stitching you've already done. Too short a needle is not the thing for this, at least with fabric this thick. You can also hold the length of the thread out ahead of your work to judge where you're going, especially on angles or curves.

Here's my coat as it is right now, hemmed, unlined, sleeve hems pinned, and the coat pinned closed at the neck only. I still need to find buttons I like. That will be my after Christmas project.


Photo Link

I have the lining just about ready to go in now, and I'm having such fun working with the silk charmeuse. My new Pfaff sews it just like a dream. I tried a 1.5mm stitch length, as promoted by Linda Lee, and it looks gorgeous. I can hardly wait to sew something else with charmeuse. It's been a long time since I did anything with it but line jackets.

Merry Christmas to All

I don't usually do holiday posts, but I found this poem at The Real Muck, and thought you all might enjoy it too.


Reflection on Imperfection

‘Tis the season for unreason

when green spills from wallets

of those believing in traditional pleasing.

‘Tis the season when people pine for a fine Christmas tree—

white pine, balsam fir, white spruce, Fraser fir, Douglas fir, scotch pine,

whatever...

but it must be a wintergreen, evergreen, ever-perfect, perfectly-shaped

Barbie bush.


In the nippy air, hundreds of Barbies form green lines

with straight spines, very vertical trunks, ample branches

each with a single perfectly-pointed top

waiting for its traditional spot up the

angel’s ...tush.

Partly hidden ornaments adorn lush limbs,

shiny balls peer from green mazes

and candy canes lavish properly perky

branch tips.


But Barbie’s lavish bushy branches

leave little room for ornaments

lest adornments detract from her own

flawless beauty.


***


I wander far and wide, bucking the tide

wondering why I must settle for popular perception.

I search for Barbie’s ugly cousin,

a form, a shape that doesn’t fit the mold,

flat-chested for small house

spaces.

It’s the wind-blown hair, the hole in the sock, the scrape on the knee, the spaghetti stain on the shirt, the pimple on the nose that tell a story

of living.

I like a crooked smile, spaces between teeth, scraggly hair, spindly legs

and skinny arms that reach out

open to discovery.

I want a tree that doesn’t hide,

that opens wide to embrace pride

held in accessories’ histories, their stories and the

love they imply.

I seek a spindly tree, the ugly factor with character,

one willing to show open spaces,

places for treasured ornaments grown dear over the years...

those that have lost their shine, are ragged from playful cats, have missing parts, the hippo of bedtime stories, an apple from a student, a violin recalling cacophonous practice, clothes-pin soldiers formed by tiny hands, hummingbirds like ones covering a morning field years ago in the Grand Canyon, a plastic dog a reminder of a lost pet, baby’s first Christmas 25-years ago, grandmother’s crocheted hobbyhorse and mouse, eloquent velvet-covered and pearl-studded balls made by a nearly blind friend long gone.

And then I see it—the orphan cousin in a heap

apart from the collection,

far from customers’ inspection.

I reflect on its simple beauty.

Missing branches leave

room for us.

I like my new bare and slightly crooked tree,

I like the way you hang your hand-painted sand dollar next to my beaded bird.

It is in the spaces where

we hang our love.

Perfection isn’t about shape and complexion.

Perfection lies in connections...

how we create them,

how we fill in and connect those spaces

that life gives us.

________________________________________________
________________________________________________


I don't know who wrote it if not the blog author, so I can't give a citation, but it struck a chord with me.

Back to sewing, I'm still working on my coat, and it's coming along. The sleeves finally went in nicely, and it's hemmed, so I'm about ready to finish cutting the lining and put that in, and then I believe that will be it! Sounds fast, but I don't seem to be moving very fast lately. I am enjoying doing it, though.

Hope you all are having a lovely holiday, and that you got all your Christmas sewing done on time.

Wednesday, December 10, 2008

Pocket Lining

NancyK asked for a little more info on my pocket lining method, saying it was different than she'd done before. I have to say that it's different than what I've done before, too.

You can see photos of the pocket lining in the previous post.

I'm planning to use Marji's patch pocket attachment method for these. It consists of constructing your pockets completely and then hand stitching them to the coat from the inside of the front pieces. So, I cut my coat fabric, attached sew-in interfacing cut to the exact pocket dimensions, pressed up the hems and edges and basted. I then topstitched by hand, using doubled thread (Mettler Silk-Finish Cotton) to look (I hope) like saddle stitching. I could have done a regular faced-pocket method of stitching the lining to the fabric RST and turning, but I remembered reading an article by Claire Schaeffer about telling a fake Chanel from a real Chanel and one of the things she mentioned was that the topstitching did not go through the lining. Silly me, but it stuck in my head and I thought "I can do that", so I did.

I pressed the hem edge of the lining first, then laid it on top of the WS of the completed pocket. I then turned the other edges under to fit, and pinned it. I did the whipstitching first, then just stitched invisibly (ladder stitch?) for the other edges. The lining doesn't go clear to the edges, which is hard to see from the photos in the last post. The main thing was making sure I wasn't pulling the lining too tightly. It needed just a little room to make the pockets lie perfectly flat.

I'm sure there are better and certainly faster methods, but this is what came to me.

Monogram and Pockets


Photo Link
I wanted to add some special touches to my coat, and a nice interior monogram is one of them. This will be appliquéd to the lining. I tried various threads and embroidery flosses and was a little surprised that I liked this variegated floss the best. It's a DMC linen floss. I'm also using it for a nice edge finish on the lining.


Photo Link
Here are the pockets and flaps after topstitching, but before lining.


Photo Link
Here's the inside of one set of lined pocket and flap. You can see the lining edge treatment, with a close-up below. It's just a whipstitch, but I think it gives it a pretty, corded effect.


Photo Link

Thanks to all of you that commented on my steam generator. I like it very much, and I did end up doing a pretty widespread re-do of my sewing area because of it. That was a good thing too. I have a better working arrangement now I think.

Friday, December 05, 2008

Ironing Is Exciting Now


Yes, I got my new iron, which is a Rowenta Steam Generator. So far, I'm very pleased with it, and the amount of steam it puts out is pretty amazing. It's making me re-think my sewing area arrangement though. I think I need to put a table next to the window for the iron, and for the cat to sit on and look out the window. Right now, he sits on the ironing board, and I have a special elasticized cover on the board for him. I remove it when I want to iron. I've kept my iron on the floor for some time since I don't want him to knock it off, and the feeling is stronger now, but it would be nice not to have to pick it up and put it down when I want to use it. I think he'd prefer a table too, if I can find something the right height. No rush on this, but I think it would be nice to move things around a little.


I decided to make a quick pair of pants to test things out. I desperately need some very casual pants, not least because my only pair of jeans is biting the dust pretty quickly. They're actually a pair of my regular Burda pants, but in denim. The zipper pull broke off the other day when they were almost zipped up, and I managed to get them zipped the rest of the way, but when I needed to unzip them the next time, it wouldn't budge. I ended up working on them with a pliers while I was wearing them. Not good, but I did manage to get them off. So, I first replaced the zipper in them, since even if they're not too whippy anymore they're perfect for times when I know I'm going to get dirty.

When I had replaced the zipper, I moved on to the casual pants. I used a green poly/cotton bottomweight fabric in a small windowpane check, and my usual pattern. I suppose I'd better plan on replacing the jeans pretty quickly, too. It's hard to get along without them, especially in the winter.
Posted by Picasa

Tuesday, November 25, 2008

Smocking, Pockets, Patrones, and Weights

May very kindly offered me an extra copy of the September Patrones and of course I jumped at it. It's a great issue, with a special section of coats and also of high-waisted skirts and pants as well as the usual mix of garments. It's so interesting to see the designer garments they feature. I will have a hard time deciding on one garment to try first. You can see the issue in the photo below, along with several other interesting things.


I got more weights from my darling brother. I especially like the smaller, amoeba-shaped ones. They fit nicely in the hand, and are a perfect shape for corners of pattern pieces, and for odd curves, etc. They're so nicely polished and smooth and just kind of fun to hold. Like the first long strips, they're stainless steel, as are the narrower, curved-end strips at the top.

I went to a Sewing Guild meeting last night, and our program was so good. Carla Fiedler, one of our members, is a very serious smocker. She did a Trunk Show for us, showing probably 25-30 smocked garments and a few purses, pillows, Easter eggs, and heirloom quilts incorporating smocking that she'd made. Very inspiring, as all of her construction is just as meticulous and beautiful as her smocking. The group's choice for most fabulous piece was a First Communion dress in silk with smocking as well as many heirloom techniques which she made for one of her daughters. It was just breathtaking, and obviously an heirloom in its own right.

She then taught a short introduction to smocking. She provided pleated swatches, or as she called them "doodlepatches" and needles threaded with floss. We learned to do an up-cable and down-cable and traveling stitches. I can see that it would be fun to do a real project, and was especially intrigued by a photo of somewhat abstract smocking from an Australian Smocking & Embroidery magazine she passed around.

I learned two other related techniques that were new to me as well. One is a method of knotting your thread that's very much like a french knot, and the other was a method of separating strands of floss called "Strip and Squeak". It's been a long time since I separated floss, but I always have just done it the way my grandmother taught me when I was a little girl. This is much more fun, and looks like a better method as well.

Finally, a photo of some coat progress. This is the interfacing attached to one pocket and flap. Since the photo was taken, they've both been finished, the edges pressed in place, basted, topstitched and ready for the lining. I need to cut out my lining for everything so I don't do the pocket pieces from the wrong spot.


Although The Peep was on his appointed rounds again last night, I'm glad to announce that there were no gifts in the garage this morning. After reading the comments from all of you cat lovers, I'm relieved that he didn't bring the rabbit into the sewing room for safe-keeping. Not that he had the chance, thank goodness.

Last of all, I ordered something today that I've been wanting for a long time. I've been suffering with an iron on its last legs for quite a while now (it got knocked off the ironing board, and since then the steam only works when you push the burst-of-steam button, but then the button won't come back up so you have to reach in with a pair of tweezers and pull the stem of the button back up - see how I suffer!) and its replacement is on the way. I took a recommendation from a Guild friend on what to get, so I hope I like it as much as she does. You will see it when it arrives.

Posted by Picasa

Monday, November 24, 2008

Progress and Weirdness

I'm very pleased with my coat progress yesterday. I cut off the extra fabric at the fronts, cut out the pockets and flaps (they seem to match very well,) and got one pocket/flap pair interfaced and the edges pressed.

Before I got brave enough to cut the pockets, I procrastinated by ironing 20 shirts. Now you know that means I was willing to do anything rather than start in on the cutting. Pearle was happy with his shirts though, and I admit half of them were mine that had been waiting to be ironed, so it was equal opportunity wrinkles for a while there. I don't wear shirts as much in the winter though since I like something warmer, so probably he suffered more than I. He does have a few other shirts though.

So. On to the weirdness. Our cat, The Peep, likes to stay out all night, or at least the late night through to morning, even when it's pretty darn cold, and he's a hunter. He can come into the garage to wait to get into the house in the mornings, and a lot of times he's snoozing out there when we open the door, but this morning, we found a "present" from him. He popped right in and went and drank some milk, leaving his very large rabbit out in the garage. I'd show you a photo, but it's pretty graphic. I moved the car out to clean up, and honestly, they could have filmed an episode of CSI out there! Generally he eats his catches and there's not much left but a smear here and there, although they're usually smaller. I think. Maybe this was his second catch of the night or something, because it was pretty complete still and he had no further interest in it. It was just me, the Windex, Clorox Wipes, Lysol and paper towels. I'd just as soon he left his 'trophies' elsewhere.


The Peep


"Nature Red in Tooth and Claw" around here. Definitely. He is a very nice, smart cat who knows his business, and I have to say there's very little rabbit, shrew or ground squirrel trouble in my garden, and he seems to leave the birds alone for the most part.

Now, back to cashmere, with relief.

Thursday, November 20, 2008

Coat Progress Report

Yes, I'm back to working on my coat, although it's been a harrowing process, and although life has definitely gotten in the way, I will finish this.

I've been somehow unwilling to take the next steps with it, and I finally decided that it's because I don't like the extra I added to the front per Roberta Carr's instructions. After careful looking, pinning and checking of both the muslin version and the actual coat in process, I've decided to cut off the extra and go with the original Marfy drafting. I don't know why I thought I should try to improve on them, they obviously know more than I do. Why did I not listen to Ann Rowley, who some time ago very kindly noted that this was NOT the way coats were done anywhere she's been. They always tape the edge and pull up on the tape if it wants to swing open. After my testing, I suspect that Marfy has already taken the whole issue into account somewhat anyway. So, as usual, I make work for myself that I don't need.

Part of this epiphany came about after I pulled out my corduroy/suedecloth Marfy carcoat I made last year and thought about it as I wore it. It's about the same circumference or narrower than the cashmere, and seems to be fine, even though I whacked it off shorter than designed. I had forgotten how much I like it until I put it on again. I do wish I had done padstitching in the lapels, but I didn't really know enough I guess. I'm now wondering if I could do a little remedial stitching invisibly through the back of the lapels and get results. Any opinions, or even the voice of experience? I'd love to know.

I also have been working on cutting the patch pockets and flaps, and realized quickly that I really can't match the pattern perfectly since there's a dart that ends below the top of the pocket. So, I'm going to match the front and lower edges of the pocket and match the flap to the pocket and call it good. As busy as the pattern is, I think that will be fine. I only get one chance with this since the repeat is large, and I have to have a pocket and flap that match on each side, and I don't believe there is enough fabric to do another set. I'm going to trace 2 copies each of the pocket and flap pieces so I can place them all before I cut.

So, work is progressing, although not as quickly as I could wish. I don't want to rush though, or try to do tricky things (like match and cut out the pockets) at less than optimum times, like late at night when I'm too tired to realize I'm too tired to do things right.

Sunday, November 16, 2008

Finally Finished with the Bazaar


Here is the finished pair of cuffed gloves. I finished the second one much more quickly than the first, since it was simply a matter of repeating the steps. Here's the pair as worn.

Green Gloves

The green pair sold, as did the purple below. They're a completely different style, with a plain outer cuff faced with a rayon batik.


And once again, as worn.

Purple Gloves

I came home with only 2 scarves and 3 dishcloths that didn't sell, so I feel like it went well, and the best part is that now I can go back to concentrating on my coat. The poor sleeves have been sitting there ready to set in for a week now, and I'm ready to get on with it.

I am thinking of doing a pair or two of the cuffed gloves for Xmas gifts. They're fairly quick, and rather fun to do.

Sunday, November 09, 2008

Bazaar Things


Photo Link

I'm donating things to sell at a fundraiser for my local chapter of Mu Phi Epsilon again this year, and I've knitted a bunch of scarves for it, but wanted to do something different too. After seeing a cuff (bracelet?) on a blog, I decided it would be fun to do very fancy cuffs to attach to gloves. The piece above is what I did for this. It's for a pair, and is a wool Melton with lace, roving and yarn attached using the Embellisher. I also used Shiva Paintsticks in gold and copper on them. Here's the first finished one. I think they're kind of fun.


Photo Link

Photo Link

I lined them with a rayon twill, added a couple pleats and 3 buttons. I'm sure the second one will go much faster, as the hard part was figuring out just exactly how to attach them to the gloves. I'm using the little knitted "magic gloves" you find everywhere since I wanted these to be one-size, and I didn't want to put a lot of money into the gloves. They could easily be removed from these and put on any gloves, as they're just handstitched. If the other one turns out as well, it's going to be hard to let them go. Now I have to figure out what to price them at.

For a little quicker item (I hope) I am going to try to copy Barbara's gift pouches at Cat Fur Studio. I think these would be good sellers, and I hope I can do some as nice as hers.

As an experiment, I also have begun to work on a beaded necklace that has the large fabric pieces that I've seen in some designer shows. I think I'm going to add a chain twisting through the yarns to add a little more weight. Both sides of each piece is beaded, so no matter how they hang, it's the "right" side. I think a ribbon bow or two may go on this too.
xxx 

xxx 
Posted by Picasa

Monday, November 03, 2008

Perfect Isn't Perfect, Part 2

You may remember a post from July, 2008 called Perfect Isn't Perfect Anymore. It was about the new designer at Valentino and her first couture collection for the house. There were a lot of great comments about it, and we were all agreed that it was a big change from previous Valentino collections.

Well, you may have noticed that the designer who did the collection, Alessandra Facchinetti, is no longer at Valentino. She was touted as the one who would update the house and its image, but apparently there was unhappiness with her work or the way things were going in general.

I probably wouldn't have done a post just about that, but Kathleen Fasanella, of Fashion-Incubator fame left a comment recently on the original post which I'm going to quote here. You can use the link to the original post above to see the photos to which she refers. As always, she is very good at diagnosing problems and not only how they got there, but how to fix them. Here's her comment, and be sure to click on her link to see the photos with comments and arrows, etc. on her photo site.

kathleen said... 1:30 PM, October 17, 2008

Good eye Liana (as usual).
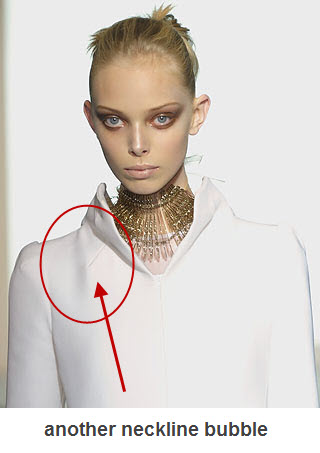
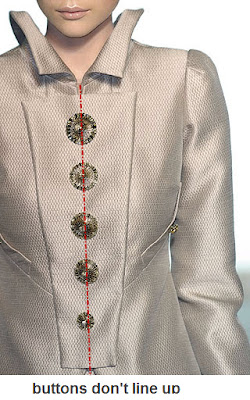
Don't know that I agree about the collar points, could be a matter of garment sway from walking but I do see another problem with it, bubbling on one side near the dart (see these photos I've made notes on.)


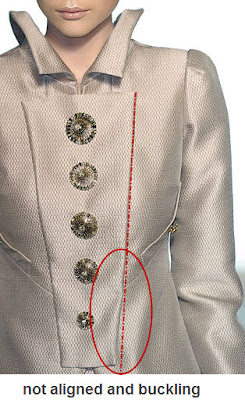
The taupe style ...that has GOT to be a proto, a last minute addition to the line. I found three problems with it, rather glaring imo. The buttons don't line up,


the aforementioned neckline bubble (same block as the white one?)


and that placket thingy in addition to buckling, is crooked.


Again, see my photos.

RE: zipper. The end point pucker is the least of it really, you can see it's puckering well before that end point. Pretty lousy imo. Also, look at that seam on the sleeve; it's caving inwards.


With all that embellishment weight, that really needed some kind of infrastructure to reinforce the seam.


I was very interested in her comments, and I admit I hadn't consciously noted the neckline bubbles, at least as a separate problem. The beige suit being a very quickie prototype rings true with me, as the placket itself looks like the kind of thing I would just fold from a scrap to see how I liked the look. It looks like they did that too, and then just tacked it on without interfacing it or figuring out how to attach it beautifully, and called it good for now.

Kathleen has graciously offered to elaborate if we have any questions, so please, ask away!


Edited to add the photos with Kathleen's notes, which I should have done in the first place.


Coat Progress


Coat Photos Link

Finally, a progress report on the cashmere coat. It's coming along pretty well, if by fits and starts. The photo above is of the coat body after underlining, with the collar just sitting on the coat with a pin on each side at the front. Notice how beautifully it works. I padstitched the undercollar and stand, but I think the fact that the collar is designed with a separate stand has a lot to do with the way it looks. It just has to have the perfect shape because it's designed right into it. Here's the collar sitting on a table after it's been stitched and turned, and with the upper and under stand seams pinned together.


I agonized quite a bit over the layout and cutting. I have to say I'm pleased as punch with the way the pattern match came out. I did try really hard to get it right, but there's always an element of luck that plays into it, I think. Anyway, it came out almost perfectly. I have to think that one of the reasons this fabric was expensive is because they used a fabric designer who made it possible to get this really great match. Here's a close up of the match on the side back and center back seams.


Tomorrow there probably will not be any sewing done because we're having a new furnace put in, and it's right down by my sewing area. I'm going to move a lot of things, and cover everything I don't move with sheets so I don't have to worry about dust on everything. At least I hope I won't.

Saturday, October 18, 2008

I'm Back, Sort Of

I'm back to the land of the bloggers, etc. now that my dear brother has fixed me up with a loaner computer until he gets back from his trip and can figure out what to do with mine. I must agree with Melodye when she said grown-up brothers are the best. They sure are! I will try to take some pants pictures too. I just have basic programs on this computer and none of "my" stuff, and I'm trying to keep it simple. I've got a back-up drive, so almost everything is still there, even if the computer itself dies, so I'm not worried yet.

Sally, the tailoring book Claudine recommended is Classic Tailoring Techniques: A Construction Guide for Women's Wear by Roberto Cabrera and Patricia Meyers.
I bought mine used from Abe Books. Thank you Claudine for noting the book in your comment. My computer was so wobbly at that point that if I'd tried to get a link to it, I'd probably have lost the whole post, etc. As always, all help most gratefully accepted!


Patricia, I found a tutorial on sewing godets from Els, who always knows the right way. We're very glad she does, and especially that she's willing to tell us, too. I hope this answers your questions. You can always come over to Stitcher's Guild and ask there, too.

Thursday, October 16, 2008

Pattern Weights


I mentioned to my brother that if he had a chance, some of the metal scraps from his workplace would make really great pattern weights. Well, he found some very nice strips and buffed them smooth and here they are! The really neat thing is that they're stainless steel, so I don't have to worry about them corroding or rusting. They're heavier than they look, and I really like them. I've only had the little round ones that you see in the photo with them, and these are so nice for long pattern pieces.


He's also been trying to help me with some computer issues I'm suddenly having. (That's why it's been a while since I posted.) That's his field, and I'm probably going to have to get a new computer at this point, so he's searching for what I need. He's a pretty good guy!

I have been sewing a little bit, and am about to begin cutting out my coat since I finally found layout plan I'd made before ordering the fabric. I thought I was going to have to do it over, but I've been spending a lot of time filing lately, and going through the enormous crop of paper that comes into the house continually, and I ran across it. In a pretty logical place, actually.

I realized I'm really hurting for fall pants. I didn't need anything fancy, just everyday stuff, and I made a pair with my TNT pattern, adjusting slightly at the waist/high hip as per the tailoring book Claudine suggested, and I like the results very much. I used a stretch woven brown with pink pinstripe. As usual, the stretch part seems to cause problems at times. The back has some draping from the side hip down, which I thought was indicative of a lack of length there, but the front is perfect, and I couldn't figure how I was going to fix this. I wore them last night to choir rehearsal, and my friend Jane, the real expert diagnosed "baggy butt" and I think she's right. The pattern has a flat-seat adjustment already, which normally is fine, but with the stretch factor of the fabric, I think it needs more. I may end up with a stretch woven pattern and a regular pattern, which is okay. She suggested a diagonal fold from mid-hip to just below the crotch point, so I'll try that next time. For now, these are fine for every day, and no one is going to call the fashion police I'm sure.

I did side pockets on both sides, with a side zipper, and it worked just fine. I've usually done only a pocket on the non-zipper side before. I put a front stay in these because of the stretch factor and the pockets, and that was a real success. The bad thing is the fabric wants to crease rather easily. They're cute, though, and isn't that why we sew?
Posted by Picasa

Monday, October 06, 2008

Gedifra Vest


Photo Link - Click NEXT to see all photos.

Here's the finished Gedifra Vest I've been knitting in my spare time. It's a very quick project since it's done with a gauge of 1.75 stitches per inch. That kind of gauge lends itself to basic shaping, and this had interestingly shaped pieces to make up the vest, but I think it could be improved. I'd like it a little longer in the back and sides instead of angling toward the front points quite so precipitously. I didn't use the recommended yarn, Gedifra Highland Alpaca. Instead I substituted Rowan R2 Fuzzi Felt. I got the gauge perfectly, and I'm not sure if this has less body than the original yarn, but I doubt it's a lot different, since the original is 50/50 alpaca/wool, and alpaca is very, very soft. The Rowan I used is 58/16/20/6 Nylon/Wool/Acrylic/Alpaca. I would assume that wouldn't be softer than the Gedifra. I folded the collar double, under itself and tacked it down to give it a little more body, and to control it a little. It was pretty floppy, and awfully wide. You'll notice in the pattern photo below that the model is artfully holding the collar up. Now if it would stand like that by itself, that would be great, but at this gauge, I don't think that's likely to happen. Anyway, I'm generally pleased with this. It's a fun piece, and nice and cozy.


I want to thank everyone who commented on my lace skirt. Especial thanks for all the ideas and opinions. I wore the skirt to a music club meeting this afternoon, and didn't wear anything I had a photo of. I wore the olive Jalie Tee, and a longer slip that I made this morning accompanied by great trials and tribulations.

As always, it's a mistake to think that anything you do at the last minute is going to go smoothly. I don't know what was with my new machine, but I suspect pilot error. I was trying to attach the elastic, and all I got was major jamming in the bobbincase. I re-inserted the bobbin again and again, I re-threaded, I read the instructions. Finally it snapped out of it and ran like a dream. I took about 3 smooth stitches, and it stopped because the low bobbin thread light came on. So, I wound a new bobbin and found out I didn't know how to make it stop winding a bobbin in the middle when I saw it was taking all the thread left on the spool! So, I found a pretty good match of thread to finish. After that, it went quickly, probably because there was nothing else to go wrong. The slip turned out to be just the right length, and now I think I like the slightly shorter one better, although I didn't think I would. The shorter one pushes it just that much further away from that Mother of the Bride look that I really want to avoid. I think my look has a general tendency to lean toward formal/dressed-up rather than casual anyway, so I try to pay attention to it. I was glad I wore the thin top this afternoon however, as it was really warm in the room, and any jacket would have been too much.

When I got home, 3 nice things had come in the mail. The October Burda WOF magazine, my order from Pam at Sew Exciting Sewing Supplies, and a new knitting bag like my old favorite from the Nature Conservancy. It's not on their website but it's one of their "Join us" gifts. The Holiday Vogue Knitting came at the end of last week too, and there are some very nice things there.

Tuesday, September 30, 2008

Lace Skirt is Finished


All Lace Skirt Photos in Greater Detail Here

I finished the Prada-inspired lace skirt last night. I feel like I did enough work to make 3 skirts because I kept having to redo things that weren't working the way I originally did them. I suppose I shouldn't be surprised, since sewing this kind of lace was a new experience for me. I really like the final result, but I did take the long way around.

As you may remember, I originally planned to underline with silk organza, then decided to attach it only at the waist and CB seam because I was afraid of trying to control the drapiness of the lace against the not-going-anywhere organza. As it turned out, I was right to be wary of this, as the lace was heavy enough to gain a lot in length as I went along, and I finally ended up cutting the organza completely out of the skirt, leaving it only in the zipper area. I left enough extra there to be able to turn it twice and stitch it to the inside of the zipper tape. This gave a nice finished look to the zipper and as I think about it, I think it would have been almost impossible to securely sew the lace to the zipper alone.

I knew I needed to cover the zipper with lace. I stitched a piece of lace to the left side of the zipper area, and used 3 clear snaps to attach the edges of the lace to the right side. I was afraid this would make the skirt difficult to get into, but it seems to be no problem at all. The photos show the slip inside the skirt so you can see a single layer of the lace. You can see the organza-wrapped zipper-tape here too.


Covered Zipper - Open


Covered Zipper- Closed

This skirt is fitted at the waist and hip, with darts in the front, the zipper, and a plain fabric waistband. I used the appliqué technique for the CB seam, and it did give a fairly invisible join. The arrows point to the seam. There are applied lace motifs at the top and bottom of the photo.


Here is the way I did this seam. I basted it in as a plain seam with wide allowances, pressed it to mark the seam line, then took the basting out, laid one pressed line over the other and basted along the line I planned to use as the overlap edge. It can be obvious which side should go on top at any one point, and you can switch back and forth if you like. I then went back and stitched the top layer invisibly to the lower layer, trimming as I went. You won't get a straight stitching line this way since you are following the lace design as you go along, but as long as the pressed line is straight, you will have the same result as if you had stitched a plain, straight seam, but you will have an almost invisible join, and no obvious break in the lace itself.

The hem is simply turned up, pressed and hand stitched. As I went along, when I got to a place where I didn't have a smooth turnup because of excess fullness in the hem allowance, instead of shrinking out the fullness as you might normally do, I clipped through enough of the allowance to be able to move the cut edges over until I had a smooth allowance again. This was easiest to do in the "holier" parts of the lace, as I could just take out some of the design and stitch what was left back together. I took photos of this, but honestly, you can't tell there's anything going on. The non-ravelling properties of lace makes it easy to do lots of things that you might not otherwise think of.

I love Prada's applied lace motifs that give texture to what is essentially a flat fabric, and I wanted to use this idea. I found that I needed to tack the motifs on so they had a little volume and would flutter a bit, rather than stitching them flat. I began to worry that I was doing too much, or getting too dramatic, but I really love the results. I ended up using 19 motifs, plus the zipper-top appliqué. You can see the way there's room for the motif to move.


The slip I'm wearing under the skirt is not the first one I made. I wanted it a little longer, and I put 3 rows of the decorative stitching on the hem of this one.


One last note. I had places where the bars between motifs were deteriorating. I think this was because I washed the piece so many times after dyeing it to get out the excess dye. I should have waited until I got the Synthrapol before dyeing, and I think this wouldn't have been a problem. It was easy, if somewhat time-consuming to fix. I simply did buttonhole stitch over the bars that needed reinforcement or replacement.

We all discussed on Stitcher's Guild Lace Sew-Along topic why the Prada skirts might be selling for $2000, but after finishing this, I can see why. I'm sure they didn't use my learn-as-you-go "technique", but it seems that there would have to be a lot of handwork to this kind of skirt even if you did it all correctly the first time. My skirt has machine stitching only to reinforce the basting that attaches the waistband. Everything else was done by hand. I'm not sure it all had to be done this way, but it seemed easier at the time.

If you look at the photos on Pbase from the link between the first 2 photos, you'll see that I took photos of it with several different tops/jackets. I'm not sure what I really like best, and if you have an opinion, please let me know. If you have an idea of something else that would look even better, tell me that too.

Sunday, September 21, 2008

A Slip for the Lace Skirt


All Lace Skirt Photos Here

I've been waiting for the lace skirt to quit "growing". Every time I pin up the hem and hang it up, the next time I come back to it, it's a little longer. It's definitely slowing down, but I want to make sure it's completely finished before I actually do the hem. It's been a unique experience. I've never had anything lengthen quite this much. There are lots of holes in the lace though, so I suppose I should have expected it. I'm really glad I didn't mount it to the organza first thing. That would have been an exercise in futility.

So, I decided I would hold up on the skirt for another day and make the slip to go under it while I was waiting. I used the darker gunmetal tricot rather than the very silvery tricot. It seems to almost disappear behind the lace and organza, which is just what I wanted. I thought of putting a lace edging around the hem, from the skirt lace, but decided plain would be better, and much stretchier. I wanted some kind of subtly decorative hem. Since I have a new machine with all new decorative stitches, I checked out a few of them. I ended up using the Greek Key stitch, which is one of the 9mm wide stitches on offer. I like the way it just looks textural. The thread is a pale gray-green, and is what I used to do the organza seams. I like the way it almost disappears into the fabric, although you can see it better in the photo below than in real life. It makes an interesting touch, but isn't going to try to be the star of the show.


I really like using decorative stitches in this type of situation. On lingerie and on linings, I think they're just perfect. Otherwise, it's kind of rare to find a use for them on serious garment construction. Excuse the wrinkles in the photo. I've been needing a new half-slip, so I wore this one this morning since it was done. I think I'll make a couple more while I'm in the mood. I'd like one a little bit longer than this, but not much.

The other thing I did last night was to cut out some individual lace motifs to apply to the skirt. I think these turned out very nicely. They look a little like round goldfish with long fins and tails. I'm not sure how many I might need, but I don't think a huge number is called for.