Showing posts with label Bag. Show all posts
Tuesday, September 11, 2018
Frugality and a New Gym Bag
I thought this was just interesting. To me, if no one else, anyway. I have always liked mending, to some extent. It's nice to be able to keep something going if I really like it, rather than throwing it away for a small problem
The photo above is my OLD gym bag, which was a give-away from the World Wildlife Fund, probably about 8 or 9 years ago. It has held together remarkably well. I have mended it several times, but mainly it was the straps that would come loose. I've reattached them several times. I think I re-sewed the seams at some time or other, but only because there was a small opening in one, and I thought I might as well just reinforce them all while I was at it.
As you can see, the laminated layer finally was de-laminating, and I didn't know what to do about that. I love the size and shape of the bag though, and the fact that it has almost no weight by itself.
The bottom photo is my new gym bag, which is a give-away from the World Wildlife Fund. Luckily, they were still offering these as a premium, so I got a nice blue one. Still turtles, but I miss the seahorses.
Though it doesn't look like it, they are the same 'fabric'. The old one almost looks quilted at this point, but it's just the structure of the fabric and the way that it's gotten old and worn. I'm assuming the new one will do the same in a few years. It didn't start de-laminating until the last few months, so I have high hopes for another decade or so from this one.
Thursday, February 19, 2009
An ORANGE Purse
I'm not really shouting at you, but this purse is really orange, and it's really big, too.

I don't think I've ever had an orange bag calling my name before, but this one did.
I just happened to run across a nice purse organizer insert on Monday and bought it figuring it would come in handy. Yesterday, it came in handy. I'm not sure there won't be days when this bag seems a little too 'out there' but for now, it's just what I want.
I finished knitting the Filati vest and did all the finishing on it. It's nice, but I have decided that it needs a little tweaking, and I'm going to try to pick up some stitches and add to the length. I'm hoping it will be a success, but you never know. If it never sees the light of day, it will mean either that it wasn't a success, or that I never got it done. Oh well. I think a drapey yarn would have been a better choice, but if I can get the length it needs, that may do the trick.

I don't think I've ever had an orange bag calling my name before, but this one did.
I just happened to run across a nice purse organizer insert on Monday and bought it figuring it would come in handy. Yesterday, it came in handy. I'm not sure there won't be days when this bag seems a little too 'out there' but for now, it's just what I want.
I finished knitting the Filati vest and did all the finishing on it. It's nice, but I have decided that it needs a little tweaking, and I'm going to try to pick up some stitches and add to the length. I'm hoping it will be a success, but you never know. If it never sees the light of day, it will mean either that it wasn't a success, or that I never got it done. Oh well. I think a drapey yarn would have been a better choice, but if I can get the length it needs, that may do the trick.
Friday, September 05, 2008
String Bag Instructions
I thought I'd probably have to be more specific about how I made the String Bag in the previous post, and Marji has given me the push I needed.
I found the original pattern I started with. It's Everlasting Bagstopper from the Summer 2007 Knitty. It calls for 2 skeins of Allhemp 6, which sells for about $17/skein. So we're talking $34 for yarn, exclusive of S&H. I find this ridiculous for a string bag, which in my view is the sort of thing that you ought to be able to make from stuff on hand at basically no cost. Oh well, that's just me, and there's nothing wrong with the pattern itself, except that I don't like the handle or how it attaches. It's just a piece of twill tape or ribbon, and so you basically have a bucket shaped bag with a handle. Not what I really had in mind, so I changed it.
I followed the instructions up to where she starts the garter stitch rows for the top edge of the bag, then I went on my own.
Here's my (very sketchy)pattern, using 2 skeins Aunt Lydia's Size 3 Fashion Crochet Thread, for a cost of around $4. (I tried SugarNCream with my bag following the original pattern, and I thought it was too heavy looking, so I looked for a yarn/thread that looked like the right size and came up with Aunt Lydia's.)
With Size 5(US)needles:
CO 44 and knit every row for about 28 rows (14 ridges).
PU 14 st on end of rectangle, 44 on long side and 14 on end. Place marker. Continue in garter stitch around your rectangle/circle for about 4 or 5 rows.
Change to Size 10.5(US) needles and begin pattern stitch.
Row 1: YO, K2tog. Repeat around.
Row 2: K.
Repeat these 2 rows until you get the height you want before the handle area (about 8-12 inches unstretched).
Place a marker at the halfway point of your round. You will be working on half the stitches at a time. Work so that you are doing Row 1 on the right side and Row 2 on the wrong side. Of course you will now be purling Row 2. After you finish the first side (half the original stitches0 go back and do the other side to match.
BO 3 st. at the beginning of the next 2 rows, then continue in pattern, decreasing 1 st. on each side of every WS row. I like to decrease next to a selvedge stitch which is K on each row, rather than on the outside stitch. Keep doing this until you have about 40 stitches.
Next 2 rows: K2tog. across the row.
10 st. remaining.
Here's where my possible changes will come in. I changed back to the Size 5 needles and did a garter stitch strap at this point across the 10 rows on both sides and did a combined cast off at the middle of the strap. This is kind of pointless and fiddly, so I would either cast off at the 10 st. point on the first side and do the whole strap on the other side and then sew them together,
OR
cast off at the 10 st. point on both sides and use a crochet hook to do a couple rows of reverse SC around the entire bag opening and then make the strap. That would probably be the sturdiest option, but possibly unnecessary.


Photo Link
I found the original pattern I started with. It's Everlasting Bagstopper from the Summer 2007 Knitty. It calls for 2 skeins of Allhemp 6, which sells for about $17/skein. So we're talking $34 for yarn, exclusive of S&H. I find this ridiculous for a string bag, which in my view is the sort of thing that you ought to be able to make from stuff on hand at basically no cost. Oh well, that's just me, and there's nothing wrong with the pattern itself, except that I don't like the handle or how it attaches. It's just a piece of twill tape or ribbon, and so you basically have a bucket shaped bag with a handle. Not what I really had in mind, so I changed it.
I followed the instructions up to where she starts the garter stitch rows for the top edge of the bag, then I went on my own.
Here's my (very sketchy)pattern, using 2 skeins Aunt Lydia's Size 3 Fashion Crochet Thread, for a cost of around $4. (I tried SugarNCream with my bag following the original pattern, and I thought it was too heavy looking, so I looked for a yarn/thread that looked like the right size and came up with Aunt Lydia's.)
With Size 5(US)needles:
CO 44 and knit every row for about 28 rows (14 ridges).
PU 14 st on end of rectangle, 44 on long side and 14 on end. Place marker. Continue in garter stitch around your rectangle/circle for about 4 or 5 rows.
Change to Size 10.5(US) needles and begin pattern stitch.
Row 1: YO, K2tog. Repeat around.
Row 2: K.
Repeat these 2 rows until you get the height you want before the handle area (about 8-12 inches unstretched).
Place a marker at the halfway point of your round. You will be working on half the stitches at a time. Work so that you are doing Row 1 on the right side and Row 2 on the wrong side. Of course you will now be purling Row 2. After you finish the first side (half the original stitches0 go back and do the other side to match.
BO 3 st. at the beginning of the next 2 rows, then continue in pattern, decreasing 1 st. on each side of every WS row. I like to decrease next to a selvedge stitch which is K on each row, rather than on the outside stitch. Keep doing this until you have about 40 stitches.
Next 2 rows: K2tog. across the row.
10 st. remaining.
Here's where my possible changes will come in. I changed back to the Size 5 needles and did a garter stitch strap at this point across the 10 rows on both sides and did a combined cast off at the middle of the strap. This is kind of pointless and fiddly, so I would either cast off at the 10 st. point on the first side and do the whole strap on the other side and then sew them together,
OR
cast off at the 10 st. point on both sides and use a crochet hook to do a couple rows of reverse SC around the entire bag opening and then make the strap. That would probably be the sturdiest option, but possibly unnecessary.


Photo Link
String Bag & Lots of News

Photo Link
I decided to knit for the Mu Phi Fundraiser again this year. I skipped last year, and was surprised, but rather pleased too, that my things were missed. I'm making scarves again, which you can see at the bottom, but I also thought it would be fun to try knitting a string carrier bag. This is my second attempt, and I'm kind of pleased with it. It's a slight modification of a pattern I found somewhere on the web. I'm going to do the next one a little differently and I think it will be improved, although I'm happy with this one for myself.
Here it is flat.

And as worn over the shoulder.
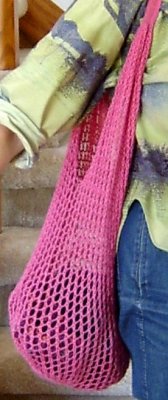
One of the problems I have with the idea of making this type of bag as a replacement for throw-away bags is that so many of the patterns I see have you using very expensive yarn. That seems ridiculous, especially if I'm going to try to sell these at a bazaar. Wetspun linen would be ideal for these and they might last a hundred years, but who's going to pay over $20 for one, and that would only cover the cost of the yarn, with no profit for the group. So, I decided to use something cheap and available (I got it at the dime store). This is Aunt Lydia's Size 3 Fashion Crochet Thread in mercerized cotton. It should be quite durable, and has the right look for what I wanted. I'll see how it holds up, but I think it will be just fine. This bag took almost 2 balls, which was less than $4 worth of yarn, about right for something like this, I'd say.
Here are the scarves I'm making.
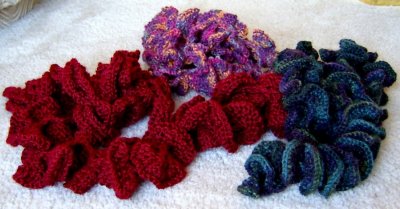
These are a fun pattern called the Potato Chip Scarf. The pattern is from KnitPicks, although I cast on 180 stitches, as per their original pattern, and it gives you a nice length. These are great for wrapping around the throat, and they stay in position wherever you put them.
I finished the Marfy #1234 jacket last night and I'm very pleased with it. I may wait a day or two to take photos. I've got a rotten cold right now, and I'm not looking too fashionable, to say the least. I will just tease you with a (semi-fuzzy) photo of one of the hand-embroidered buttonholes halfway done. You can see the double strand of thread I used to cord these. After they were done except for the bartack on the inner end, I pulled up the cording threads to shape them, tied the threads off and finished the bartack.
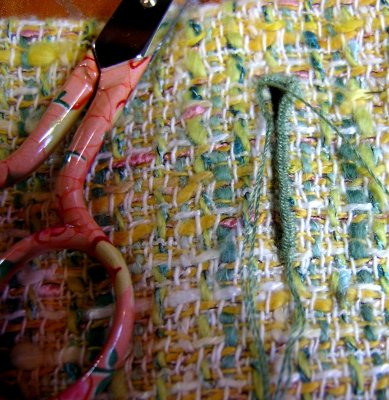
Photo Link
I worried about them and tested and tested and thought I'd made a big mistake in not doing bound buttonholes to start with, but as it turns out, I love them. I love the look, and I really loved doing them. They're really fairly fast too, which shocked me.
My other big news is that I'm getting a new sewing machine!!! It's a Pfaff 2144 which has been very gently used. In fact, my sister traded it in on the newest Pfaff CV, and she literally almost didn't use it at all, so I'm getting a wonderful, and basically brand new machine. Her dealer is checking and updating it, and shipping it to me, and I'm hoping it will get here by the end of next week. Much anticipation here, and a little anxiety that the learning curve I've heard about with these will be a problem. Naturally, I want it to do everything I want, right now, rather than after I figure it out. Patience is NOT my middle name. It's going to be fun though, and I'm ready for a new machine I think. I haven't worn out my Elna, but it's been going strong for 20 years now, and it's showing its age a bit here and there. I take care with it, but it will be fun to have all the new bells and whistles.
I will be interested to see if the embroidery bug bites. Somehow I doubt it, although I want to try buttonholes using the embroidery capability of the machine. I saw this on a Babylock TOL machine a couple years ago, and it was the first thing that really made me sit up and take notice of an embroidery-capable machine.
Subscribe to:
Posts (Atom)