This tutorial/compilation was originally posted on Sewing World beginning on September 8, 2004. Luckily, I saved a copy. I have removed all the posts that were not mine, and so if it seems that I’m answering some questions that aren’t asked, be assured they were asked, just not posted here.
Several people have very kindly asked for my ideas on men's shirts, as I've made a lot of them. I thought of calling it Everything You Wanted to Know About Shirts, But Were Afraid I Might Tell You!
To start with, here are a couple of links.
This one is a review that I did.
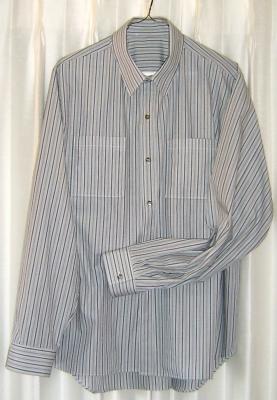
Here is a link to photos of shirts I've made.
(If you use this photo link, or click on any of the images here, it will take you to my photo site, where you can view much enlarged versions of the photos, for more detail.)
For a first shirt, I think one thing that's very helpful is to use a fabric with a pattern of woven (not printed) stripes or plaid. This will give you nice grainlines to use as sewing guides all the way through. Matching stripes is very easy, as they only have to line up really on the pockets. You will of course cut striped yokes, cuffs and collar with the stripes horizontal, and plaid fabrics with the yokes (and possibly pockets) on the bias. When matching plaids, I use the point of the armscye seam as my matchpoint, which corresponds to the corner of the sleeve.

A lot of the finished look of the shirt begins with the layout.
Make sure you have your fabric design placed so it will be flattering. Either center a plaid line on the back or have one on each side, equidistant from the center. If you don't do this, it will look crooked. Check to see whether your fabric is thin enough that you'll see any doubled layers through it. If for example, the stripes on the under yoke will show through, they must either match exactly with the outer layer, or you can use a plain fabric for it. I've also used a thinner fabric for the inner yoke when using a heavy wool shirting.
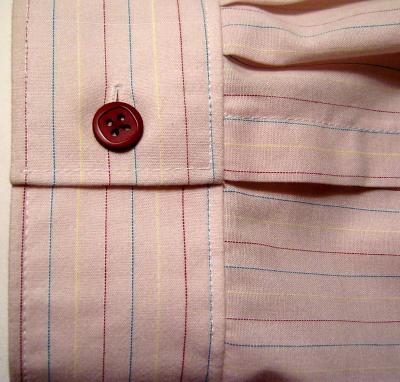
When cutting out your upper collar make sure there will be a nice edge to the collar. You can see through the pattern to where the seamline will be. Make sure you have a stripe line at the edge or near it. The cuffs are the same way. For the cuffs, I like to cut them the long way, with the fold at the buttonhole edge, and seams on the other 3 sides. The buttonhole edge is the important one. People notice it and the collar first on a shirt, and if it's worn with a suit and tie, that may be all they really see. Putting the fold on that edge will give you a very flat edge, and make those 2 corners easier to turn, as there's only 1/2 as much bulk. Also, there's no seam allowance to bother your buttonhole. I cut my cuffs somewhat wider than I need, and cut the interfacing the finished cuff size. When I'm ready to fuse my interfacing, I lay the 2 cuff pieces out and make sure I have a matched pair with stripes or design the same way on each. Since I cut them a little wider than I needed, I can fiddle with the placement, and have plenty of room. I fuse the interfacing (I use Pellon's ShirTailor throughout) (updated on 11-3-06 to add that I’m now using a Brooks-Bros.-type interfacing called Pro-Woven Fusible) and then can use the edge of the interfacing as my stitching guide, always making sure to go right along a stripe or plaid line. It's much more important to have the cuff follow the fabric pattern than to have an exact seam allowance. You will trim your SA anyway. This works really well, as the fabric pattern is woven in, so you know it's perfectly on grain.
Collars are treated similarly, although I fuse the entire collar and undercollar, including the SAs. I also fuse both inner and outer stands. This allows me to trim very closely without worrying about raveling. I often make the collar first of all, as they're interesting, and then they're ready when I need them. I use KwikSew patterns for shirts, so they have 1/4" seam allowances built in, but if your pattern has wider allowances, be sure to trim at least the collar stand and shirt neckline to 1/4" allowances, and your placement will be much easier. Always remember that you are matching stitching line to stitching line, and pay no attention to your cut edges. The smaller the seam allowance, the easier this is.
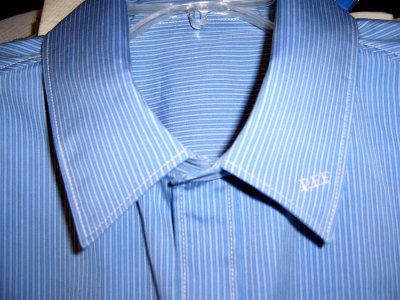
Your upper and under collar pieces should be separate, and different. The undercollar is slightly smaller since the uppercollar will have a longer distance to travel from the stand over the curve to the collar edge. The smaller undercollar will help set that curve permanently. Sew them together, stretching the undercollar to fit the upper. You can either take one stitch across the corner or pivot at the corners, but whatever works best for you is what you should do. Turn your collar gently without worrying too much about the points right now. You just want to see if the ends match. They must look as if the fabric pattern is continuous from edge to edge. If one side is slightly longer or shorter, go back and change them to match. They don't have to perfectly match the pattern piece shape, just each other. In fact, you can draw any point shape you want. As long as you leave the edge which meets the stand alone, the rest is pure design opportunity. Also, check the outer collar edge and make sure you're on a stripe if you need to be, or at least that it's consistent throughout. Once you get them to match and everything looks fine, press the seams flat, and I trim pretty closely using a pinking shears. At the corners, take one snip across, then sort of tapered toward the corner, then do the rest. Then, press the seams open on a point presser, using quite a bit of steam. Now turn your collar for real. Push the points out very gently with your finger, then take a large needle and pull the points out carefully to the shape you want. It helps to do them at the same time, a little on one, then the other, as you don't want to over-turn them. Once you're done, hold the collar in position again, and make sure you like the way it looks. This is the focal point of your shirt. Now is the time to understitch if you want to. I used to all the time, now I don't so much. It depends on the fabric. Really nice cotton doesn't need it as much. Heavier fabrics need it more. If your undercollar acts like it wants to roll to the outside, understitch it.
Now, look at your collar. The undercollar should not meet the uppercollar at the cut edge. Do not trim them to match. Instead, pull the undercollar to match the uppercollar, and pin them. See what a nice roll your collar now has. Baste this edge.
Topstitch and or edgestitch next. I like to use the blindhem foot as it has a little lip I can adjust to run right along the edge of the collar, and can adjust my needle position to the width I want. Take a threaded hand needle with no knot and put it through the first collar point, beyond where you will stitch. This will give you a handle to begin stitching cleanly after you pivot. When you stop, be sure your needle is all the way down and on its way back up before you pivot, or you will have a skipped stitch (which you can fix with a hand stitch if necessary, so don't panic.) Once you have turned the first corner, remove the needle and thread from the point, and put it in the other point. I use this technique on cuff corners too. For cuffs, begin your topstitching very near the inner corner on the button side of the cuff, as this area will not show when the cuff is buttoned. Now is the time to monogram the collar if you plan to.
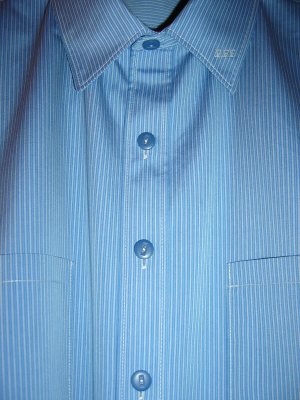
I like a folded, cut-on front placket. Add a 3 5/8" extension from the CF of the shirt. On the button side, cut off 1/2" of this. On the buttonhole side, fold under 1 1/8" and press. Fold under 1 1/8" again and press. Topstitch this edge. This is the outer edge of your placket. Fold under 1 1/8" a third time and press. Topstitch this edge. Unfold, and press. This is the inner side of the placket, and it now looks like a stitched on placket. This is self-interfaced, and the pattern matches! This is one of those times when you can fudge a little if you need to, to make your fabric pattern end up in a good spot. Stripes or plaid make the folding extremely easy also, as there is no need to measure all along, just follow the line. If you do measure, and don't follow the line, it will look crooked. Since the lines are on grain, you want to follow them anyway. The button side is folded only twice, and stitched along the edge. The buttons will hold it down, along with the collarstand and hem.

I know that yoke depth is a debated point. Shallow yokes are touted by some authorities, but since the yoke is the only "fitting" opportunity you really have with a shirt, I think it's not quite as one-size-fits-all as you might think. The yoke is what the rest of the shirt depends upon, literally. Most men's shirt patterns also seem to have really dropped shoulders, which I don't like too well. I narrow the width of the yoke if necessary by making tucks in the interior of it rather than by cutting a smaller size. This preserves the armscye of the size you want. You can't go clear to the shoulder point probably, as it's a flat, shirt sleeve, not a set-in sleeve, but you can get fairly close. All this just depends on what look you want.
I think the depth of the yoke should be related to the back shape of the wearer. A shallow yoke that stops above the forward curve of the spine will make the wearer look stoop-shouldered. With very erect posture and a slimmish build, you can have a very shallow yoke and it will look fine. With very broad shoulders and a lot of body depth, a shallow yoke will look like it is perched on top of the shoulders almost like a toy shirt. The back of the shirt should hang fairly straight from the bottom of the yoke, so see where that is. It should look elegantly graceful, with a nice drape to the back.
Men's dress shirts are not particularly fitted through the body, and in my opinion, it can be a very sexy look. Much more so than a very fitted silhouette. Watch the movie Working Girl and notice while Harrison Ford works in shirt-sleeves, or when he changes into a fresh shirt. This is not a skimpy garment, but doesn't it look rich? Cary Grant also, or any of the classic Hollywood stars wore classic shirts. Men's shirt styles do not change quickly. Traditional is just that.
For a fun detail on a striped fabric, try doing a CB seam on your yoke, and putting the straight grain at the shoulder yoke seamline rather than the back yoke seamline. This will turn your fabric enough that you will get a chevron seam at CB. When you do this, you need to be very sure that you match the stripes exactly, as this detail is a real eye-catcher, and it will be immediately obvious to everyone whether it's right or not. You can keep the yoke lining on the straight of grain for less bulk at the CB, or you can chevron it also. If you keep it on the straight, and it's thin enough to have show-through, you may want to use a plain fabric for the inner yoke.
David Coffin didn't write his book until I'd been making shirts for quite a few years, and I had pretty much settled on the techniques I like, but I did read it when it came out, and was especially interested to see that he credits quite a few ideas he uses to an OOP self-published book by Barbara Helyer called Sewing Magic. That's what I've used as my guide. It's been a while since I read his book, but mainly I remember that he's dead set against fusible interfacing. Also, that you must only use natural fibers. Well, I'd already broken most of his rules. I used mainly blends for years, as I was dead set against ironing. I will agree that the finest cottons and linens sew beautifully, but why not use the great techniques on lesser fibers too, and why not wait on the really expensive fabric until you've practiced a little. I also do not flat-fell seams. It never crossed my mind to do so, and I've always used KwikSew shirt patterns, which have 1/4" SA, so would be pretty tough to flat-fell. I sew the seam, serge the SAs together, and topstitch. I've never had a problem with raveling or anything. The SAs are narrow enough, you really don't notice them. If Pearle ever rolled up his sleeves, I guess I'd consider doing the sleeve seams, but that's about it.
As for fusible interfacing, I really think it's the only way to go if you want a really perfect, very crisp collar and cuffs. I agree that it would make the placket boardy, and probably stick out funny, and I don't add interfacing to the placket at all. You can starch shirt collars of course, but I have found that it's kind of hard on them, and the fabric will wear much faster.
I do not do a rolled hem. When I'm ready to hem, I pin the stand together as if buttoned, and hold the front opening to see if the front edges are exactly the same length. If not, I trim one, then serge the edge. I then turn up the hem the width of the serging and stitch, usually with a 3-step zigzag. This makes a flat edge, and no obvious line of stitch bulk. I then turn up again, and straight stitch. I do not press the hem up before I stitch, as I can manipulate it with my fingers as I stitch. This takes a little practice, but as you begin the curve up to the side seam, turn up the hem right at the side seam so the seams match, and see how much you must ease or stretch to reach that point. Do the same thing coming down the other side. You will be aiming for the straight grain parts to match perfectly when you get there.
The sleeve placket method I use isn't something I thought of; it just happened to be the method in the KS pattern I like best. The sleeve has a regular underarm seam, but also has a seam which goes from the placket to the point where the yoke joins the back. So it is a 2 piece sleeve. I've done the "move the sleeve seam to the back" thing on blouses I've made for myself, but I've used this shirt sleeve consistently on all men's shirts since I found it. It's just too easy not to. I took some photos of the pattern pieces, and also found a mostly unsewn shirt that I photographed. I probably cut it out and began it several years ago, then put it away for some reason and forgot about it. Luckily, it's still in style so I guess I should finish it. The collar and front plackets are done, and the stands and cuffs are fused. You can see that I cut my cuffs the long way, and fuse the outer half only.
I'm sure it would work to move the underarm seam to the placket seam. I believe there are instructions for this in one of the Palmer/Pletsch books, but you can easily do it by cutting your pattern where you want it, and taping the old seam line together. It might depend on the grainlines a little. The smaller, undersleeve piece on the pattern I use has the seamline slightly off grain. Not much, but enough to tell when I match plaids, etc.
I haven't seen the Margaret Islander videos, but have heard raves about her for a long time. I recently saw someone (can't remember the name) on Sew Much More who was doing shirts. Her big thing was tailor's tacks for marking, which worked very well. That, and just precision sewing.
I only use a smaller stitch length on the seam at the front curves of the stands. I've topstitched with 2.5 spi most of the time, but sometimes smaller, and I like the larger stitches unless the fabric is terribly fine. Pearle is very adamant that he doesn't wear blouses, he wears shirts. I got quite an education as to the difference, at least in his opinion when I first started making his shirts. So, most of the shirts I make are rather conservative in style and fit. Fabrics I thought looked fine were decisively dismissed, and he's not really into anything that might appear to be a dressmaker-type detail. I see a lot of those recently on men's shirts, at least in magazines. I do go slightly wild on buttons, but he seems to think that's okay, or maybe I'm not as wild as I think.
All striped or patterned shirts especially should have the cuffs cut lengthwise, so the pattern goes the right way. Why do I cut the cuff long and skinny? It's so I can have the fold at the buttonhole end. You get two beautiful corners that way (I do square-ended cuffs) and there's no seam allowance to get in the way of your buttonhole.
Here is my cuff method in detail. Cut your cuff lengthwise, as above. Interface the outer cuff half only. Match the outer cuff to the sleeve edge RST, making all necessary sleeve tucks. Stitch the outer cuff to the sleeve. Now fold the inner cuff around the sleeve so it forms a tube with the sleeve in the middle. Sew the button end of the cuff together. You will be able to see exactly where the cuff should end by where the sleeve is. You may want to roll the sleeve slightly out of the way after you mark where to stitch, before actually stitching. Now, resew each end of the outer-cuff-to-sleeve seam that you sewed first, but this time, sew through the inner cuff too, but leave several inches in the middle unsewn, so the outer cuff is attached to the sleeve all the way across, but the inner cuff is only attached at the ends of the seam. Trim now, except the unsewn inner cuff area. Turn the cuff right side out. Now, turn it inside out again, but do it by pulling the cuff through the unstitched area you left in the cuff-to-sleeve seam. With the inner and outer cuffs RST, you will sew the seam at the lower edge of the cuff. Trim, and turn back through the same unsewn area. Your cuff is now completely finished, except for a small area you may sew by hand, or baste and close with your topstitching. I can complete this operation while leaving only about 2" that will need to be closed.
These are some of the shirts I've made over the years. Pearle gets to choose the fabrics, and he has picked some that are wilder plaids than I would have ventured to choose for him, but he seems to find colors that are really great on him. The cranberry plaid shirt in the front is one of my favorites.


16 comments:
Thanks so much for the shirt tutorial! I can't believe you made all those shirts. Wow! They look fantastic. But I guess once you've made one, five, ten...the process gets easier, no?
Liana cool, thanks for moving this over on your blog. I love shirtmaking and talking about shirtmaking, but I have been making my own patterns and once I used a Burda which was ok but it was just for a casual short-sleeved shirt.
Have you used the Islander's pattern? I am tempted to give it a try if just to purchase the professional information. Now I am off to hunt down a KS pattern.
Thanks again.
Heather
Thank you so much for all of your insight ! My oldest son has been begging for button down shirts. Until now, I've dreaded making them. Thank you for the empowerment!
What a great tutorial. I especially like the idea of cutting the cuffs long instead of square. I think I'll have to read along with your instructions as I try this. Thanks for this information. You are very kind to share so much.
Linscee
Thank you all for your very kind comments!
Heather, I haven't tried the Islander patterns, but I know people like them.
Lori, You're right about familiarity making it easy. Once I made the first few to perfect the fit, I used to make 3-5 at a time. It's not much slower than making one, and it does improve your skills to do 5 collars in a row, etc.
Linscee, I think you'll like the lengthwise cuffs. :)
Thanks Lianna for posting this. I'm bookmarking it for future reference.
Wow, this is an eye-popping post on shirtmaking! I am really impressed by that row of shirts , and I like your husband's taste in checks! This post is being bookmarked right now. Thanks for sharing all this hard-learned information.
Hello! :0) I have stumbled across your blog while searching for assistance in shirt sleeves. I am certain you can answer my question! I am an "intermediate-level" seamstress. My darling husband just bought me a serger a couple of months ago and I have lots of learning to do. My husband needs me to make some long sleeve dress shirts into short sleeved shirts for him. Can you share some pointers? Can you tell me what stitch I might be able to use on my serger for this? I thank you greatly for your time.
Sincerely,
Mrs. Klause
www.clothedwithscarlet.typepad.com
Titus 2:3-5
Mrs Klause, Congratulations on the new serger! Have your DH try on one of the shirts, and mark the length he likes his sleeves, or you can lay a short sleeved shirt over the long-sleeved shirt and do it that way. (If you notice the sleeve sticks out on the sides, you may have to narrow the sleeve, and make sure you cut the sleeve off parallel to the floor while it's on him, rather than when it's laid flat. Do one on him and copy for the rest.) Leave enough to turn a hem. Cut the sleeve off and serge around the edge to finish it. Press up your hem, double if you like, and stitch. You could probably do this with a coverstitch, but I am not the one to help with that. Good luck!
Hello, I'm sorry to leave a message here, but I didn't know where elso to. On your Marfy 9419 jacket, you had some beautiful hook closures. Where did you get them? Susan
scc_internet@msn.com
Hello Liana,
I was looking for an e-mail address for you but couldn't find one. Therefor in the form of this comment (of which I assume that you receive an e-mail that it is posted): I started a new blog with links to sewing tutorials: http://www.sewingtutorials.blogspot.com/. Do you mind if I post a link to this tutorials there? If you don't object to a link, may I use a picture to illustrate what the tutorial is about? Could you please let me know at isedl at yahoo dot com?, Thanks Sigrid
Hi! I'd love to know if you have any patterns for clergy collars? They are so difficult to find!
Hi, Ms Spicnspan,
Sorry, I don't have a clergy collar pattern, but there's quite a bit of info on making vestments, etc. in a
thread on Stitcher's Guild.
HTH!
Thanks!
Hi Liana, I just discovered this great tutorial and I have a question: On the picture of the laid out shirt pieces I see that you have a 2 piece collar. Is this given by the pattern or is it an alteration you made? If yes, where is the advantage? Are the plackets easier to make this way?
Ok, that's acutally 3 questions ;-)
Hi Liana - I'm late coming to the tutorial, and hope you will see this comment. I loved the way you do cuffs. Thank you.
I would love more details about the placket. From the line drawings on their website, KS2000 doesn't have a 2-piece sleeve, therefore they don't have this magic placket. I'd love to understand it better. On one of your photos, it looks like the seam allowances bump out for the placket. Does it just turn in? Do you turn in the seam allowance all the way to the top?
Thank you for taking the time to write such a detailed tutorial.
Post a Comment