Friday, December 28, 2007

The Sweaters and their Recipients


Chris and Zachary very kindly modeled their sweaters. They seemed very pleased with them, and that pleased me. Zachary is also showing his rolling pin. He's very much into cooking, and Alton Brown of Good Eats fame is his favorite.
Posted by Picasa


I took my sister to get her Christmas present today. I had told her I'd get her a thimble from Thimbles by TJ Lane, so we went to the studio and she tried on thimbles aplenty. She had her heart set on a Yubinuki (ring thimble) like mine, but her fingers are so tiny that they had to take the smallest one they made (a 3 1/2, which is what mine is) and cut it down for her, so we waited and browsed among all the other wonderful things they make while they cut and soldered and fitted. It's now about a size 1, or a bit smaller. She made inroads on their other inventory of chatelaines and various dependant tools, and she has a gorgeous piece of jewelry now which is also a portable sewing kit, basically. We pick up her thimble next week after it's been hardened and polished.


I hope you all had a wonderful Christmas and a Happy Holiday Season, and I hope it's not over yet!

Sunday, December 23, 2007

One Last Sewn Gift


Photo Link
I needed a quick gift for a little girl, and decided last night that an embellished bag would be just the ticket. Fun for me to make, and fun for her to get. I used some Pendleton wool that I'd used for a larger purse for her foster-mother a couple years ago, so I think she'll be pleased to have a "matching" bag. The lining is a black stretch cotton printed with stick figures in gold. One end of the handle is topstitched to the front and one end to the back, and a there is a snap closure. This is a very, very simple project, but I think it's just right for a six-year-old.

Showing the Inside.

Photo Link

Better Photo of the Lining.

Photo Link

Xmas Sweaters Finished


Photo Link

I finally got both sweaters completely finished and photographed. It's awfully nice to see them lying there, all done. I hardly know what to do with myself now that I don't have one of them to pick up and work on in every spare moment.

They're both made with Bendigo Woolen Mill's Rustic yarn. It's 100% wool, and very nice to work with. Especially if you hate finishing, as it comes in 200g balls, and so there are many fewer ends to weave in, especially if you splice as you go along, as I do.

The Red Tweed sweater is a Child's Size 9/10, and the Midnight Tweed is a Men's XL. The patterns is Drops 59-6

I made one mistake which I'm glad I made. This may sound strange, but I'll explain. The patterns on the front and back of both sweaters are exactly the same, and the small box pattern at the sides has a varying number of stitches which makes the size difference. The sleeves however are a different matter. The adult sweater has a narrower version of the center cable panel flanked by the horseshoe cables, and the rest in the box pattern, as on the front. The child's version doesn't have room for all that when you begin the main sleeve stitches after the cuff. I read and reread the pattern, and finally did what (I thought) it called for. The horseshoe cable pattern with the rest in the box pattern. It worked out beautifully, and I liked the sleeve extensions even better than the adult version where it narrows to go behind the back neck, since it has a little textural pattern to it, and the adult's, which uses the main cable pattern there, doesn't. When I began the second child's sleeve, I realized I had misread the instructions, and it was supposed to be the narrowed main cable pattern without the horseshoe cables. Well, I certainly wasn't going to rip out a whole beautiful sleeve just because of that, and I really like mine better anyway.

Here's my version of the sleeve. You can see the other version below.

Photo Link

One thing that's tricky on this pattern is ending the sleeve extensions at the correct point. I ended up ripping back a few rows on some, and adding a few rows on others to make the graft come out exactly in the center back.

Here's a close-up of the Shoulder/Sleeve/Body seam. You can also see the edge of the turtleneck which was picked up after the rest of the seaming was all done.

Photo Link

I had a little trouble doing the collar, since my shoulder began hurting when I started knitting around on it. A couple years ago, I had the same kind of pain which began when I picked up and knitted a similar collar on a sweater for me, which turned out to be rotator cuff injury. That sweater was much lighter than this one, and I tried to think of some way to change my method enough to make my shoulder feel better. I decided to change to double-pointed needles from a circular, and that seemed to help a lot. I think shoving the stitches along while lifting and turning the sweater was the problem. With the double-points, you knit off one needle, stop and turn, then begin again. It doesn't seem like a big deal, but it definitely made a lot of difference.

Monday, December 17, 2007

The Elves Are Busy

Thursday (the 13th) I was helping with a Christmas Luncheon and Program put on by one of my music clubs. I wasn't in charge of any of the food, and for the first time in several years, I wasn't on the program this month either. In fact, my regular accompanist, Diana, asked me if I knew what to do since we weren't performing. It did feel strange, but nice to just listen and enjoy, too. I was simply a flunky in the kitchen, mainly before we served. The dessert was the most interesting part. We have a member who lives in Pennsylvania, but is flown back every so often to perform and tour with a dance band, and it often coincides with our meetings. She had Whoopie Pies and Wilber Buds shipped here for us. The Whoopie Pies are an Amish thing, and very good, although very sweet. The Wilber Buds look a lot like Hershey kisses, and apparently the Wilber Chocolate factory employed Mr. Hershey before he started his own company, and they had the kiss-type candy form first. Isn't history interesting? All this information, and chocolate too!

I realized when I got home after the event, that I'd been paying no attention whatsoever to the calendar, and Christmas was creeping up on me even more quickly than usual. I began to knit on my nephew's sweater with greater concentration, and finished the knitting Saturday. It looks so tiny compared to the same sweater for my brother, but I think they're both the right size. Hope so anyway!

I decided to wait and block after I finished them, and I'm really glad I made that decision, since when I stitched my brother's together, I had to do some adjusting on the length of the saddle shoulder extensions which meet and are grafted at CB, and that might have been rather difficult after blocking. I've almost finished the neckband on his. I learned something too. When I first had shoulder pain which turned out to be rotator cuff injury, it began when I was doing a picked-up neckband on a sweater for me. I was using a circular needle. This is about the same thing, except the sweater is much heavier. I began on a circular, and started getting the same type of pain again. I decided that pushing the stitches along on the circular while lifting and repositioning the heavy sweater was probably the problem. I changed to double-pointed needles, and I think it's helped a lot. It's still a chore, doing 5" of 2x2 rib on Size 2 needles, but it looks really great.


Click here for a larger view and for earlier progress photos.

Now all I have to do is stitch up Zachary's sweater and do his neckband. I really was beginning to wonder if I was even going to get done in time since I started Chris's in about June, and didn't start Zach's until November. I feel like I've been doing no needlework except knitting for several weeks now, and I'm excited to be getting close to done.

Sunday, December 09, 2007

A Form Workshop & Yarn

Today was the day set for the local Sewing Guild's Dress Form Workshop. I was the "leader" which turned out to be much easier than I'd dared to hope, and mainly consisted of just spearheading the effort and booking the room. Originally, 9 members wanted forms; 8 duct tape and 1 paper tape. 2 cancelled out because of late-arising conflicts, 1 decided she'd rather just watch and help, and as it turned out, 3 others didn't show up at all, so we did 3 forms and went home early. I can't blame anyone for deciding not to come, as the weather was supposed to be freezing rain and snow on top of the snow we already have. It didn't start with all that until we were about done, which was lucky. The high was only 14 degrees today, so it was not nice any way you look at it.

I did most of one duct tape form, and it turned out well I think. We had decided not to try to stuff them today as we assumed we wouldn't have time, so it will be interesting to hear how they turned out, and if everyone likes their form and uses it. It was nice to have enough helpers to cut tape and keep an eye on how it was going.

Since we got done earlier than we might have, I had time to stop at the LYS and snatch up this gorgeous ribbon yarn.

Photo Link
It's Segué by Trendsetter and I think it's the most beautiful colors, so I hope it shows up correctly for you. Suggested needle size is a 15, but I think I can probably get by with a 13 or so. I want to make a simple shell from it, and will probably have to rewrite the pattern for the gauge of 2spi.

Tuesday, December 04, 2007

Another Warm Garment - Fleece Pants


Photo Link
These pants were inspired by the really nice warm fleece top I made at Thanksgiving. I found more of the same fabric, and bought enough to make pants, which were intended to be pajama/lounging pants, but which turned out looking good enough to wear in public if necessary, although around the house is where they will most likely be seen.

As you will see in the next photos, I did an unusual hem treatment. I wanted to have elastic at the hem so that if I did wear them as pajama pants, I could pull them down over my always-cold feet. I made them extra long, and put the elastic in loosely, and when I turn the elastic up, the pant hems appear normal. I am so pleased with this, as I don't think there's much that's flattering about elastic-bottomed pants.


Here's a close up of the hem in it's normal position.

Photo Link

And with the pant leg raised to show the elastic.

Photo Link

And here you can see the actual length of the pantleg, with my toe pointed, and just peeking out the bottom.

Photo Link

Here's a Side View,

Photo Link
And a Back View.

Photo Link

I used my TNT Burda pant pattern, with my wide-leg pattern add-on. This leg falls straight down from the widest point of the hip, and I like it very much. I made these with a drawstring waist, adding a 2" high yoke-like casing at the top. This style always fits me better than just cutting the top of the pant higher to accommodate it, although for very thin, drapey fabrics I like that better.

The little patch pocket was definitely an afterthought, as I realized when I tried them on after hemming, that I had nowhere to put my MP3 player or a cellphone, and that would never do. So, a fast, quick patch pocket was my solution.

I think these are a real success, as they're not only warm and comfy, they look pretty good as well. What more can you ask for?

Spot That Fake Chanel!

 
Posted by Picasa


Piecework Magazine had a great article this month by Claire Shaeffer about the "detective" process she goes through to decide if an unlabeled Chanel-style suit is the real thing or just a close copy.

I used to subscribe to Piecework, and liked it very much. It is aimed more at the history and curation of textiles of all kinds than at the creation of pieces today. They have wonderful instructions and tutorials for recreating some of the techniques or items that they show. Not really recreating of course, but just enough to give you a taste of the technique, and enough information to send you on your way towards learning and doing more, if you are so moved. The photos are wonderful, and their range is very wide. I finally quit subscribing, but I still look at it on the news stand now and then, and the other day I was stunned to find this wonderful article in the latest issue (Nov/Dec07) without even a hint of it on the cover!

If you're interested in the inner workings of Chanel garments, this is invaluable information. It's not exhaustive, but so much has been written already, much of it by Claire Shaeffer herself, that we should be able to find the 'basics' in other places. This is just a little icing on the cake.

One of the things that caught my eye was the use of one of the blouse fabrics (this couture suit came with 2 blouses) to embellish the lining, and also the fact that it had pocket flaps with no pockets. Unusual, apparently, but not unheard of, and the kind of thing I myself would do, since I'd know I would never put anything in one of the patch pockets on the front of the jacket, and it would simply add bulk. Since it is apparently unusual, I'm sure it was the client's idea.

The other very interesting thing was the telltale topstitching on the edge of the jacket, but not on the lining. Very tricky.

Thursday, November 29, 2007

Dress Form Stand

Carolyn asked what I was using for a stand for my dressform, and I thought I'd take photos and show it. The form itself has a 3/4" PVC pipe inside which is notched at the top with a not-very-thick, curved wooden hanger sitting in the notch. This fits into the shoulders, and the shape is padded up to match mine. This pipe fits on the outside of a metal tube which is part of the stand I got with a Uniquely You form that is very much the wrong size. The stand is something that I think could probably be easily made from components available at the hardware store. Here's a close-up of the lower part.


You can see that the "feet" are straight rods. These are threaded, and screw into the center piece, which has 4 holes for them. The metal tube/pipe is screwed into the center of the same piece. The PVC pipe fits over the metal one, and the plastic bushing slides on the metal pipe, but the PVC pipe sits on top of it. The wing-screw lets you secure the bushing at any height you like on the metal pipe, thus also raising or lowering the form. I will have to drill a hole in the PVC pipe for another wing-screw so that I can keep the form from twirling on the pipe. It's a very satisfactory system though, and should be easy to replicate if you're interested.

Here's the stand showing the bottom of the form.

Posted by Picasa

Wednesday, November 28, 2007

Duct Tape Dressform

OR:
How I Spent My Thanksgiving Vacation


Photo Link

Actually, the title refers both to the form and the top I have on. It's another of the FSG1960 tops I've been doing lately. This is a nice, soft knit-back fleece I found. I just about froze to death on Thanksgiving evening at my parent's home and knew I was going to be spending a lot of time there in the next several days. Also, I was the only one who was cold, so I went home in the evening and made this top, and it's just what I needed. In this photo, there's a dusty streak near the bottom, but I was moving things around the basement and apparently didn't notice. So, you get to see the real me.

The form was very kindly wrapped by my sister, who was here for the holiday. I think she did a beautiful job. It's very true, especially in the shoulder/bust area. The midriff/waist/hip was bigger than I measure, probably because I had to breathe while we did this, so we made some changes. The shape is still very good. We extended the form one tape-width or so below the rear, onto the leg. You can see how that worked out. I think it was probably a good idea.

I am rather stunned to see just how crooked I am, but we really checked and looked and it is just like me. Oh well, better to know than not, I guess. Here's a close-up of just the form. I'm leading a form workshop in December for my local sewing guild, and I'm glad we did this first. It's going to be interesting to see if everyone else is as pleased with their results as I am with mine.


Photo Link

Wednesday, November 21, 2007

I'm Back

I can't believe it's been so long since I posted. I've been dealing with family medical stuff, and then suddenly it was me being the "sickie." I'm sure most of you are familiar with the reality that whether one is ill or just recovering from a small procedure, the basic work of keeping the household running must continue anyway, and we know how that works. It would really be a luxury to just get to let everything go for a while, and I must say I did my best to let that happen, but all I achieved was letting some of my favorite things go by the wayside for a while, including my blog. I also seemed to lose my will to create for a time, but it's slowly returning as well, and I have been knitting anyway. Maybe not really the will to create, but there was just no decision-making happening, and what is the creative process if not a string of decisions?

I will also admit that I had no idea that I would really, really need to take it easy for as long as I did, even thought I had been told. As my nearest and dearest often says, I think I know it all, and I just don't listen. I do have to admit, he was pretty much correct there, as he often is. I do want to say a great big thank you to all of you who have sent such kind wishes. I really appreciate it, and I hope to be back to normal (?) very soon, if not right now.

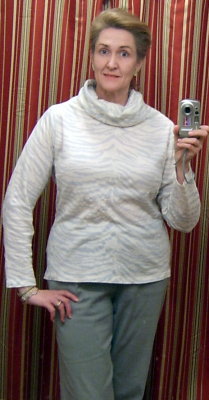
Since it's cold again, I naturally have had the urge to make some warm things to wear. The zebra print knit top I made was such a yucky knit fabric mitigated only by its really great print, but I liked the pattern blend I used of FSG#1960 with a cut-on very long funnel neck, and I repeated it in another, beefier knit, and I've been wearing it with great pleasure. Now getting a picture of it that pleases me is another thing altogether, but I finally decided that it just isn't going to get any better than this. So, we will all suffer together.


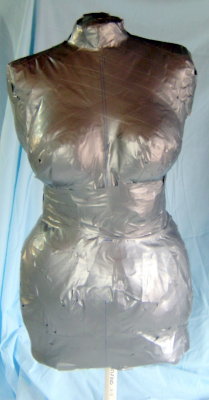
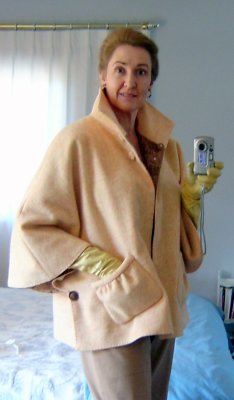
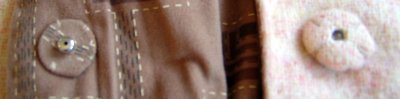
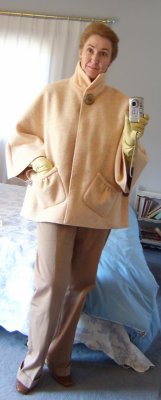
I bought some interesting knit fabric a while back that is a very deep plum, and fairly sheer. I decided it would make a very nice overblouse, and used an older Vogue pattern for the basic shape. I decided it needed something, and tried a tie collar, which was dowdy in the extreme, so I thought the time had come for an unusual approach, so I took some HugSnug rayon seam binding that I got on a 100 yd. roll from the Pendleton outlet, and which just happens to match the lace fabric, and started making loops along the collar. It's definitely different, and I like the way it turned out. I'm using the former tie collar as a belt. I edged the sleeves with the seam binding as well, using it almost like a flat piping. You can see a close up below, and the colors are pretty true, at least on my monitor.

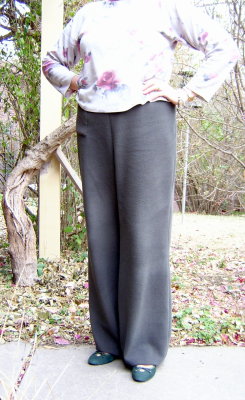
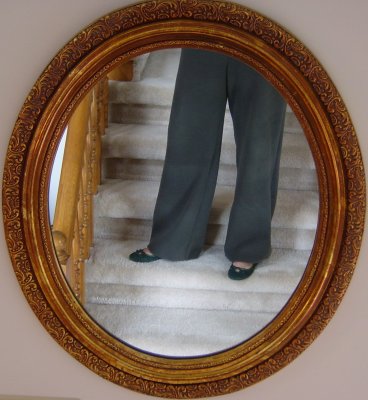
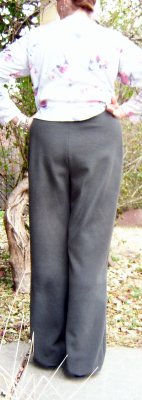
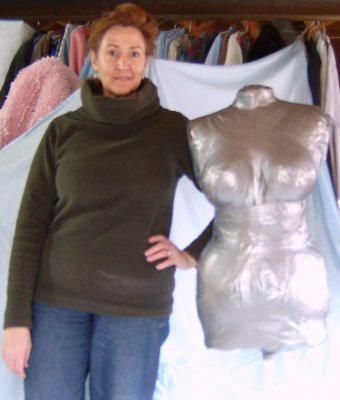
Here's the overblouse, over the blue top, which is NOT what I plan to wear it with, but it needs something with a collar, and I have nothing the right color and style, and it's too see-through to wear alone. The pants are another pair from my favorite Burda pattern, and the fabric is not what I had hoped. It's a polyester microfiber, but it's not nearly as nice as the fabric I bought a few years ago that I thought was very similar. This is drapier, and it's horribly staticky, and nothing seems to help. It doesn't actually crawl up your legs when worn, but it attracts every cat hair and dust mote within a 3-block region, and it seems unwilling to shed wrinkles. Now if polyester wants to wrinkle, what is the point?


Posted by Picasa


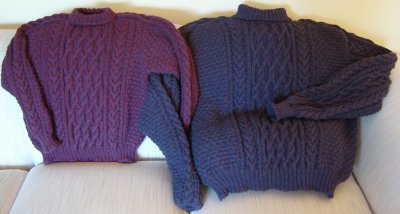
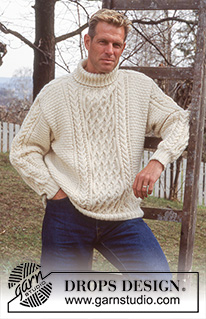
I have been knitting away on my nephew's Xmas sweater, which will match his Dad's in style, but in a different color, and I'm getting close to dividing for the armscyes. It's going faster since it's smaller, but I'm making it a little large so he can wear it for at least a few years.

Thursday, November 01, 2007

Ruffles Aplenty - Mitts are Done


Photo Link

Here's my version of the Ruffled Fingerless Gloves. The yarn is 100% alpaca in a very dark brown. I lightened the photo a little so that the details would show up. It's a very quick project. I realize that I did one more row of ruffle increases than the original, which makes them a little more dramatic, but I think they're kind of fun this way. In a firmer yarn, I would probably only do 3 increase rows.

Wednesday, October 31, 2007

Llamas & Alpacas & Yarn, Oh My!

We are so lucky to have had the Grand National Llama & Alpaca Show here every year for the last 5 or so at least. It's not only great fun to see all the charming animals, most of whom like to be petted and are wonderfully soft (if you haven't felt Alpaca fiber "on the hoof" you don't know what you're missing!) but there are myriad fiber acquiring opportunities!

I usually purchase yarn, and perhaps some roving or other ingredients that may catch my fancy, but this year I also purchased a knitted item. I fell in love with a pair of fingerless gloves which are just what I've been wanting to make, but hadn't found a pattern yet.

Photo Link The very talented lady who made these had come up with her own pattern, and while I could mainly figure it out by counting rows, etc., there was one spot where I wasn't sure what she'd done. She gladly told me, and I have now made about 3/4 of a pair of my own from the brown alpaca yarn I also purchased. Fun knitting, and a very fast project. Here's my progress so far.

Photo Link

These were so popular on the runway at the Fall shows, and were mainly shown being worn over gloves, so that no matter what the glove shaft length, they worked under the shorter-sleeved jackets and coats that have been all over this year.

Here's my entire haul from the show. Coral llama yarn, with a green bonus Cria pin, the brown alpaca yarn, and the fingerless gloves. I also bought a single hand needle-felting needle to use for "basting" when working with my Embellisher.


Photo Link

Saturday, October 27, 2007

Orange Chocolate Chip Cookies


Here's what I came up with when using the recipe proposed by kitnrose that's been discussed on Stitcher's Guild, and which was tweaked by an actual Pastry Chef, husband of Portia, a member of Stitcher's Guild. You can find the entire discussion at the link above, including the recipe.

I made a few changes from the original, including:

Took out 2/3 cup of flour.
12 oz. Semi-Sweet chips and no white chocolate chips
added 1/2 tsp. Baking Powder
Sifted all dry ingredients before measuring, and spooned into measuring cups
added Zest of one orange (two would be better)
baked on parchment and did not flatten, as the batter was quite soft, and they flattened themselves effectively

They are quite delicate, almost like lace cookies, with crisp edges and a slightly tender middle. I also got over 6 dozen out of the recipe rather than the stated 5 dozen. The plate the cookies are shown on is a small one, no more than 6" across, so that gives you an idea of the size I'm getting.

There's not a lot of orange flavor, although there's a definite orange scent to them. I really think if you're dying for Orange/Chocolate flavor, you'd do well to use orange frosting on them.

I'm not usually a happy cookie baker, or an anything baker for that matter, but this recipe intrigued me, and I needed some cookies to take to a Fundraiser Boutique my music fraternity, Mu Phi Epsilon, is having tomorrow.
Posted by Picasa

Thursday, October 25, 2007

Hello Again

It's been quite a while since I posted, and I must admit there have been times I wanted to, but everything that's been happening lately has been just a little too close to home, and it's very hard to be detached about them. I see no reason to inflict un-fun stuff on all of you, so I was just quiet instead.

I have been knitting more than anything lately, as it's so nice and portable, and I've been doing a lot more running around than usual, so it's what fit in.

I am practically finished with my brother's Xmas sweater, and I reached into the bag for the last ball of yarn, and it wasn't there! I apparently used it all already. I can't even count ball usage by seeing where I have to weave ends in, since I was so smart and used a "spit splice" each time. Oh well, hoist on my own petard, as usual. I called Bendigo and ordered one more ball, as well as some of the Rustic Red Tweed to make a 'matching' sweater for my nephew. I ordered plenty for it. I'm sure it will be enough, as I won't be making his sweater extra long, as I had to do for my brother, who's 6'6", with very long arms. Usually I'm way under the recommended amount of yarn, but with substitution, lengthening, etc. I apparently didn't allow myself enough of a cushion. Also, as I think I reported before, this is almost the only thing I've ever knitted where I'm getting the gauge perfectly while using the recommended needle sizes. I have always had to go down at least 2 sizes for sure. So, something's going on, or maybe they just have my number at Drops. They're Norwegian, I'm Swedish, maybe Scandinavians knit a little differently. Somehow I doubt it.....

I finally began a shell with some rayon chenille yarn I bought from a blogger back when blogs were a new phenomenon, to me at least. It's a fine, flat yarn, variegated in gold, sage, olive, brown and black, and it's semi-camouflagey looking, but I like it.

Photo Link

I keep changing my mind on whether I like the stockinette or purl side better. I don't have to decide until the very end with this pattern, so that's good. The pattern is a hybrid that I made last year or so. The tank top on the right is from a Katia book, and I used the yarn shown. The further I got into it, the more I was sure that those straps, no matter how darling, were not going to be good on me, and I started looking for a pattern that would be easy to combine with what I already had done. The shell on the left from KnitOne magazine was perfect, and I have been very pleased with the look and fit of the resulting garment, so I decided to try it again. I change to the KnitOne pattern right before the armscye shaping.

Photo Link


If you haven't listened to Toya's interview with Carolyn yet, you have a treat coming. It's a well done interview with a very interesting subject, and they're obviously having a great time throughout.

Lastly, I saw this and took the quiz to see What Kind of Mythological Creature Are You? I'm feeling slightly mythological lately, so why not? (As I told my accompanist after explaining my research findings (which alluded to Zeus's many partners of all kinds, no surprise there) on Ganymed while doing the Schubert song of the same name, "It's mythology. It's educational.") So, maybe this is educational too.

You Are a Pegasus

You are a perfectionist, with an eye for beauty.
You know how to live a good life - and you rarely deviate from your good taste.
While you aren't outgoing, you have excellent social skills.
People both admire you - and feel very comfortable around you.

Monday, October 08, 2007

Zebra Quick Top


Photo Link

This top was the culmination of a process that included a muslin for a different pattern, which needed a lot of work, although I was planning to do it. It was a princess-seamed knit top with a tall funnel/cowl neck. I bought this fabric simply to use as a muslin since it's very thin, but the price was right for a test. After I stitched up the muslin, I realized that I very much liked the way the print fell, and thought I'd see if I could get some more to make a top to wear from it.

I was able to get more, and then wondered whether I really wanted a knit top with princess seams after all. I sometimes think I'm curvy enough without adding to it with both knit fabric and major shaping seams, so I decided to use an old favorite pattern, the top from Fashion Sewing Group #1960 Twin Set. As Carolyn has said, why re-invent the wheel when you have a pattern you already like? I added the collar from the Vogue 8323, which was what I really liked about it, and am very happy with the results. I will wear it under other things becasue, as I already mentioned, it's a very thin knit and not the best quality by any means, so the drape of the fabric isn't too great, but I fell for the print and the color, which is a bit more pronounced than in the photo, but not by much. It feels like it's going to be nice and snuggly for winter, especially with that collar.

My other really thrilling news is that I did NOT accidentally throw away my Fall Marfy catalog, thank goodness. I couldn't believe I had, but I searched and searched for several days with no results. Then, I dreamed about finding it, although it wasn't where I dreamt it was, and I knew it couldn't be, but it was in that room, and I felt like it was a sign that it really was still around and I should just keep looking.

I'm also getting sort of close to the end of my brother's Xmas sweater. I've finished increasing on the last sleeve and will soon begin the shoulder shaping. Then it's just assembly and the collar. I can't believe it. It's been quite the epic project, and I should start a matching one for his youngest boy, who is crazed for anything "just like Dad's", but I may have to do something else for a while. At least his would be much smaller, and surely go much faster..... I'll have to think about it.

Sunday, September 30, 2007

I am a Rockin'Girl Blogger?

Well, I guess I must be. Mardel of Sew Distracted has designated me as such, and what a nice thing to do! I haven't felt much like a rockin' anything lately, so this is a very nice boost to the psyche. If you haven't already read her blog lately, go quickly, and look at the wonderful trims she has found, as well as all her other interesting and lovely projects. She's quite the inspiration, and a wonderful writer as well, with an equally interesting knitting blog.

The skirt that won't work for me will work for someone else, and I finished it yesterday for her. I think it turned out well, and it's really cute. Just not cute on me. I hope she likes it.

I did a muslin of a knit top last night, which turned out kind of cute because of the fabric, which was a cheapie printed jersey. Cream with pale acqua zebra stripes. The top needs major changes beyond what I already did to it, and I won't use this fabric for the final version, as it's really too thin and lightweight, but I may see if I can get some more of it, because it's just really cute.

The handwork on the skirt finishing is where I was practicing with my new thimble ring, and I really like it. One thing that's nice about these thimbles is that the "dimples" where your needle goes are square rather than just rounded depressions, so once it's against the thimble, it's in one of the tiny squares, and can't slide off. All of their designs have this feature, and I think it's a real safety device, to say the least.

Friday, September 28, 2007

Yubinuki for Me


Well, I'd never heard of a Yubinuki either, but it's a sterling silver thimble ring. Once I realized that I could use and wear it while still having the end of my finger free, I was interested. I'm always taking my thimble off to be able to knot a thread or whatever. I'm still getting used to this ring, but it's becoming more and more natural and I really like it.

 
Posted by Picasa


Our local Sewing Guild's first meeting of the year was Monday, and our program was Thimbles by TJ Lane. TJ's daughter, who makes thimbles along with her mother, lives in Lincoln, so it was easy to get her to come for a meeting. She's presented a delightful program, and tempted us all with her beautiful custom-fit thimbles, as well as chatelaines and all the accoutrements one could dream of.

One thing that really surprised me is that the closed end thimbles are very poor sellers for them, and so they're slowly discontinuing them. That was what I would definitely have wanted had I not seen these, but the open styles are much more decorative, and of course they allow a long nail to fit through the thimble, so I can see why they may be more popular.

Luckily I have some hand sewing to do lately in finishing a skirt, so I'm getting some practice with my new thimble, and it takes a little practice, since now I need to push from the side all the time, and usually I just push wherever.

Wednesday, September 19, 2007

Marfy Cape is Finished


Photo Link
Yesterday I finished the Marfy cape I've been working on. I'm really quite pleased with it. It's a simple design, and yet the finished product has so much style, and the details are so nice, that it was well worth making. I plan to wear it a lot this winter, as it's going to be really warm. The lining, a printed poly moleskin, is very light in weight, although being polyester, it should be warm, but the wool face fabric is heavier than I thought it would be. It's fairly loosely woven of large threads, but the cape is quite heavy. It's a great shape to wear over almost anything. It has a vintage feel to it, yet at the same time it looks very up to date with many of the things we saw on the runway for Fall.

The very large button on the front is ceramic with a rakĂş finish. It's 2" across, and I thought I'd prefer large covered snaps for the actual closure rather than a buttonhole that large, and I covered both halves of the snaps according to the fabric they were sewn to.

Photo Link

Here it is with the snaps fastened.

Photo Link

I used Pam's (Sew Exciting) Pro-Woven Standard, a non-fusible interfacing in the collar and pocket bands. The pockets themselves were sewn to the jacket front by hand after they were constructed. I just love the shape of them! Almost the last thing I did was to resew the pockets by hand, catching the lining so the garment hangs together better when you put your hands in the pockets.

I also hand prick-stitched the edges of the cape. I thought it would look better than understitching, especially when the cape is open. I used a variegated cotton machine quilting thread from YLI called Mango, which matches the colors in the fabric. I like the way it shows, but not aggressively, and in some places almost disappears when the right thread color is on the right fabric color.


The sides are stitched together at the point where the buttons are attached on the front and back. You can see the shape of the cape, and the way it works here.

Photo Link

I like the collar best standing, but it also folds down.
You can see all the photos here.

One last plus is that I appear to have enough wool left for a straight skirt, my favorite. That should make a fun ensemble this winter.

Monday, September 17, 2007

More Books & Some Sewing

I ordered a couple books last week, and received them Friday. Both of them are a little off the beaten track for me, and one is strictly inspirational.

I noticed Creating Sketchbooks for Embroiderers and Textile Artists

by Kay Greenlees some time ago, and since I have been thinking for some time about what I could do to improve my skills in recording and developing ideas, I thought this might be helpful as well as an interesting read. I'm taking it slowly and trying to really absorb the ideas, which are myriad, and so I'm not through it yet, but so far I'm pleased with it. It's a little more skewed toward the art side of things, but that's okay.

The other book is Embroidery by Federico Rocca. It's an amazing coffee-table size book that shows many examples of couture garments with embroidery as well as some embroideries from the archives of the embroidery studio featured. The designers are all or almost all Italian, and there are some things that have captured my imagination. I'm thinking of embroidery of all kinds now, although it's not something that's featured heavily in my wardrobe to say the least. The book has some ideas that are very non-traditional, and others that bring to mind ways to use them that are not too over-the-top.

I've been working on the darling free Cape pattern from the latest Marfy catalog, and it's turning out really well. I'm using a heavy wool coating from Pendleton. It's a melange of yellow and pink, which sounds odd, but I really loved it when I bought it, and I still like it. It was a cut piece 2.5 yards, and I only bought one. I realized that really wasn't enough for a coat, which is what I wanted to make. Of course they were out by the time I got back, so it's been waiting for its pattern mate to find it, and it finally did. It's at the upper left of this photo, and I think the pockets are just the cutest thing.


I'm using a printed poly moleskin for a lining, which is nice and warm, yet light in weight, as the wool is quite heavy. I have it all together except for the spot where I turned it. I've been hand prick-stitching the edges with a pink/yellow variegated cotton quilting thread, and the effect is nice. It shows a bit, but not aggressively. Now I need to decide on buttons and whether I'll do the side closures as shown or some other way. Bows are coming to mind, but I'm not sure that's what I really want.
Here's the wool.

Photo Link