Tuesday, October 27, 2015

Tiny Hawaiian Shirt

This Hawaiian shirt is for an 18-month old. 


It's Burda magazine #136 from March, 2007.  What a great source for children's patterns. I never throw those magazines away, and eventually you realize you have a fairly classic pattern for most children's garments, and quite a few adults as well.


I heard that Nikki was having trouble finding a Hawaiian print shirt for Carmine's Halloween costume (he's going to be Ace Ventura, Pet Detective) and I volunteered to assist.  Then I had to find fabric. 

 I realized that most Hawaiian prints are very large-scale, and would overwhelm a small boy.  Luckily, we have a great source for prints of all types here.  The Cosmic Cow.  It's a quilting shop, but a really great one.  I was pleased to find just what I wanted.

This is a photo of the pattern schematic and beginning of the instructions, in case you don't know what Burda patterns are like.

I've made a lot of shirts, but never one this tiny, and it was fun.

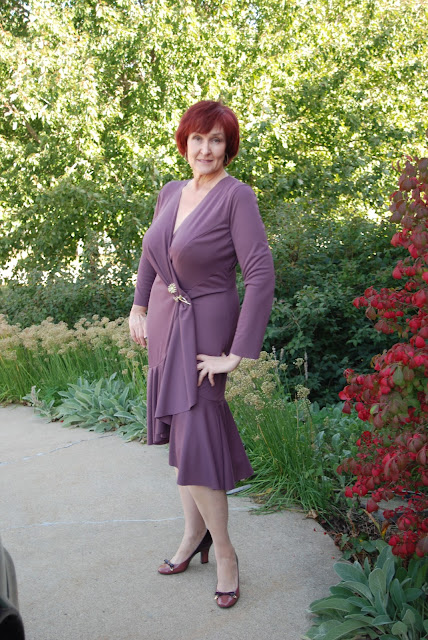
Flounced Mauve Dress

Ruffles are not my style, but flounces are not ruffles, and asymmetric designs are always fun.

This Marfy pattern (#3744) appealed to me immediately when I received the catalog, and just FYI, there's a floor-length version that's beautiful and would make a great prom or evening gown.  It's a separate pattern, which I can  understand, since all of those flounces are redrafted to attach to a longer main skirt.  This keeps the proportions correct.

It was somewhat challenging to alter since the bodice is not symmetric, and it also has no 'regular' darts.  So I used a combination of a princess FBA and using my saran wrap block to make sure I had made the changes I needed.  I think it turned out pretty well, and actually, this was my 'muslin', though I had hopes that it would be very wearable.  I think it is.

I used a lightweight matte jersey I got from Kashi at Metro Textiles in New York. 

I left all the edges raw.  In snoop shopping in NY and Chicago recently, and online of course, I am seeing a lot of this, and if they can do it, so can I.  The trickiest part was making the hook and eye at the top of the zipper look neat on the outside since there was no facing to sew it to.  I think this works well.  It's visible, obviously, but not messy looking.  It's stitched through the top of the zipper tape for stability, and to control the zipper tape as well.

Wednesday, October 14, 2015

Kearney and Sarah Veblen


I  had such a good time in Kearney last Friday and Saturday with old and new friends from the Kearney Area ASG chapter and the NBMCC (Nebraska Bishop Method of Clothing Construction).  They put on a fantastic Expo every fall, and this year the presenter was Sarah Veblen!  Of course, I could not miss it.

What an expert fitter she is, and I am dying to try some of her techniques.  I'm on my own, since I was unable to stay for the hands-on workshop on Sunday at Cari's lovely sewing studio.  It makes me think about going to one of her sewing weeks in Baltimore.

Here are a couple more photos of  Sarah's classes, but you can probably tell that I was enjoying, and taking notes more than I was taking photos.


Marfy 1128 - Autumn Cocktail Dress - Completed

This latest iteration of Marfy 1128 turned out really well, I think.  This is the finished look.  It's hard to catch the sparklieness of the actual dress without having it be almost impossible to actually see.  I got to wear it this past weekend to a fundraising dinner, and I felt very appropriately dressed.


 The hem is my favorite part.  I love the way it drapes and catches itself up, especially in the back.  I changed the back neckline from a very low square back to a higher scoop, which is still fairly low. 

I have quite a few inner construction photos for this.  The blog photos are smaller than those you can see if you click here.  As  I think I said previously, I underlined this with a fairly heavy satin lining, almost something you would use for a coat lining.  I turned the satin side toward the body, and extended it about 5" longer than the dress hem edge. 


 You can see how I turned the hem up to the outside on the finished garment photos, but here is the inside of the hem, which comes out very nicely since all the raw edges are inside the rolled part on the outside of the dress.

The original pattern has front horizontal and vertical darts, and gathering at the neckline under a chiffon collar.  I stitched the horizontal darts, but used the other ease to drape from the waist up to the neckline.  You can see close ups of the neckline and waist draping here.
The facing you can see on the neckline is a folded bias strip of the lining fabric.  The neckline stands out in places, as it is supposed to, and the bias band helps it to stay close to the body in any case.
 These two photos show the inside front of the body of the dress with the stitched waist tucks.
In the close up you can also see the stitching which tacks the bow in place.


 This is the slight flange edge of the sleeve, almost just a facing which peeks out.  It's widest at the top, narrowing to nothing at the side seam. 
You can see inside that it is also a bias strip, but of the fashion fabric.

Finally, you can see that the extra-long invisible zipper opens the entire length of the side seam.  I really have learned that this is not too long a zipper for a dress like this.  It makes it so much easier to put on, and without spoiling one's hair or makeup.

Wednesday, October 07, 2015

Pins!


It may seem a little weird to get very excited about straight pins, but we sewers know that there are pins, and then there are pins.  My favorite used to be Iris Pins, but the last batch I bought simply weren't as good as they used to be, and this seems to be the consensus.  So I've tried various brands and types.  Clover Quilting Pins aren't bad, but I knew I hadn't tried everything out there.

When I was in Portland last April with the Fiberly Group, we went to Josephine's Dry Goods, a lovely store.  She had Insect Pins in Size 2, which I like so far.  I wanted to try some more, and decided to see what other brands and types were available. 

I ended up purchasing Size 000 pins, to see just how much difference there was in sizes.  These are much finer than the Size 2, and bend more easily, although not as easily as you might guess, given how fine they are.  I like the little gold ball heads on the black pins, and have been happy to use these.

The photo above is of various sewing pins in my collection, and the 2 insect pins.  They are the black ones, and the smaller one on the right is the Size 000.  The pin on the far right is  your average every day pin.

Monday, October 05, 2015

Autumn Cocktail Dress

I'm excited about this dress. It's been awhile since sewing has been this much fun, and I'm enjoying it. I'm going to a Friends of Opera Gala fundraiser this Sunday, and I thought I wanted something new to wear.

I'm using a TNT pattern, Marfy 1128. It's a fairly basic sheath dress, but with the gathered neckline under the chiffon collar, it give you a lot of leeway to manipulate the neckline if you don't want the collar.
One thing I have learned with this pattern is to use a much longer zipper than I originally thought necessary. This makes it so much easier to get into. I bought a bag of invisible zippers last time I was in LA with Kathi Rank shopping the Fashion District, and so I happened to have a 34" invisible zipper in an acceptable color (dark green), which goes in the left side seam from the armscye to the hem. I probably would not have purchased this long a zipper on purpose for this, but it's great, actually. Apparently the longer, the better.

I found the fabric at Hancock, and it really spoke to me. It's a very thin, non-wonderful brocade, but I love the colors and the look. This actually shows the wrong side while it's being cut out.
I'm underlining with a thicker satin lining fabric. Originally I thought I would do something along the lines of a car-wash skirt, as they are so current, and finally wearable now that they're not being shown only with absolutely nothing underneath them. However, I like what I have come up with even better. I extended the underlining about 5" below the brocade and then turned it to the outside and asymmetrically attached it. Here's a photo of it on the dressform with the hem pinned. I am pinning a draped effect from the left waist to the right shoulder and I think the bow will be staying, but you never know.