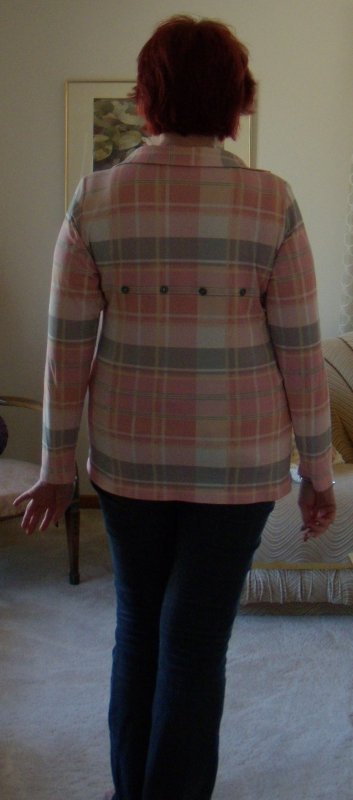
I naturally planned to match the plaid on this top. I didn't think
much about it, and since the most plaid I've matched were all the shirts
I made for Pearle, I just used my fall-back plaid matching method, and
matched the lower armscye points. It always worked beautifully on his shirts, but as you can see in the following
photo, there was a little problem when I got to the
dart. Duh. So, now I had a design opportunity camouflaged as a
mis-matched side seam. Although something like the seam shown below would be unremarkable in a lot of RTW, it is almost unthinkable in what I make for myself.
I think my solution is rather fun, and it was fairly simple, although the spongy knit made it tricky to do a horizontal tuck very easily. Not like pressing a beautiful tuck in say, linen. But with a little hand basting, it all worked out, and the side seams are fine, and the back is FUN, if I do say so myself.
I used fairly flat buttons, and they don't seem to be uncomfortable to sit against.
Side note: I've always remembered my Mother telling about a beautiful dress her mother made for her to wear to one of her wedding showers. It had covered ball buttons all the way up the back that looked like the buds the dress had in the print. She said she just loved it, and had covered all the buttons herself, and then she wore it and tried to sit with her back against a chair. Well, she said she had perfect posture for that shower, and her back never touched the chair....because it was SO uncomfortable. And they changed the buttons when they got home.
The pattern I used is the top from Nancy Erickson's Fashion Sewing Group #1960 Twinset. Besides my usual personal alterations (adding a CB seam, bust dart, swayback alteration and shortening above the bust) I scooped the neckline and added a binding and collar as shown in a book called 19 Shirts from One Pattern. It was a premium at the State Fair one year, and it has some very good ideas in it, including the super easy and easy-to-follow instructions for seaming the binding to itself so that you have a nice finish, and it's the correct length. This is the back of the shirt, showing the binding its seam, and the collar above.
Here is my iteration of the instructions:
For 2" binding (1/2" finished width) you mark a point 3 3/4" from the end of the binding, and a point 3" on each side of your desired finishing point on your garment. Match the marked point on the binding to the marked point on the garment and stitch, stretching binding as needed, but NOT stretching the garment, until you get to the second marked point on your garment. Now mark 3 3/4" on the binding from your stopping point and cut your binding there. Now match the binding to itself, RST, with cut ends at a 90 degree angle, having a square of binding overlapping. Stitch from point to point lengthwise. (Pin first to check you have it placed correctly.) Trim allowances on stitched seam. Then stitch the joined binding to the garment edge.
I used 3 rows of topstitching on the hem and sleeve hems. I think it weights a knit hem nicely and it hangs a little better, plus it flattens it better than a single row of stitching.


3 comments:
Cute top and I love your solution!
Adorable! and the buttons sure make a nice touch, great save! Love the colors n you.
Great save and a lovely result!
Post a Comment