Thursday, April 19, 2007

Basted Coat


Photo Link

Here's the coat from the Draping Workshop, in progress. I have basted all the seams except the shoulder-to-wrist sleeve seams. They are simply pinned.

I am kind of pleased with my progress on this coat. It's going to need a lot of careful work on the closure placement, and the sleeves will be narrowed slightly at the underarm. I am planning a plain hem, but not a level one. Right now, I think I may do some leather or Ultrasuede binding on the other edges. The fabric is quite heavy, as I carry the extra skirt around while trying it on, and yet it's light on the shoulders, which I didn't expect.


Photo Link

The CB collar seam is permanently stitched, as is the CB seam in the upper back, and the first few inches in the lower back; the rest of the seam below that is pinned. I think the fabric grain looks good, and rather decorative as well. I wonder about a half-belt in the back that would dip down below the seam, maybe quite a ways. If I do binding, it could be edge-bound as well.

More Draping Workshop Observations

I must admit that I was so nervous the first morning as I was getting ready, I felt almost ill. I was hoping the class would be what I wanted, that I would do well, or at least well enough not to be the class dud. I was also wondering what my classmates would be like. The workshop was open to students, and at a very good price, so I wondered if there would be a lot of students, and whether they would "look down" on those of us who might be self-taught (and old and un-hip, to boot.)

There were 10 students out of the 14 of us, a couple grad students and the rest undergrad, most of whom were going to be taking the beginning draping class with Dr. Trout in the fall, and wanted to get a jump on it. Everyone was very congenial, and very interested in getting down to the subject of the class. One of the undergrads was an art student who was interested in the subject. One grad student had an art degree and was returning in the fall for a design degree (or something) and her mother was with her. She was a longtime home sewer.

The other older participant had been the fashion illustrator for Hovland-Swanson, a very high-end women's clothing store where I worked while in college.

I mentioned that Dr. Robert Hillestad was in the workshop as well. He was such a charming, courtly individual, and Dr. Trout introduced him to everyone, saying that it was such an honor to have him in the class, as he had studied draping in Paris. He replied that this was an opportunity not to be missed. He is an emeritus professor, and I think former head of the department. The Textiles Gallery is named after him and he is very active in it. He was working on things for an exhibition he is scheduled to put on just about a year from now. The second day he brought in a bunch of things he's thinking of using in the display, such as painted silk lengths and garments and hats he'd made, mostly felt, with stitched crowns. All sizes up to about 4 feet in diameter. He had us put them on while he talked. He also had a wrap made of knitted "strings" with his "signature" tassels (these were made from rayon seam binding which was bleached and painted) and windchimes. It was really amazing. He made it for a show in Korea and hasn't displayed it anywhere else, so was thinking of using it for this.

Back to the class. The paper draping was first, with a yoke which began from 2 rectangles. One for the front, and one for the back. We learned how to pin to the form correctly, mark the pin points, copy the other half of the pattern after truing and marking the lines, and then repinning to the form, and doing "additive" draping. this is pretty self-explanatory, as you are adding pieces to it. Because the paper is not drapey at all, it's a little tough to get a real idea for what's going to happen. Only one person used the yoke-beginning to move onto a garment I believe, and she did a tabard-like piece that was very cute.

We then watched a demonstration of how to get a circle the width of your fabric, and began to drape our circle capes. We were shown how to make it closer fitting, how to place seams for various purposes, add slits and openings, etc. We then draped a straight piece onto the cape, to be a mandarin collar. Most of the circle capes didn't really appeal to me at all, but they were cute. I of course was approaching the class from a completely different point than most. They want to design for others, and I am more interested in what I want to make for myself. Also, I realized that most of the students really haven't done a lot of sewing, and so they were approaching the bound buttonhole and leather binding demonstration from a very different point. Various shapes that were obvious (I thought) were new to them as well.

One of the garments in the gallery show was a cape by Pauline Trigère. It began not with a circle, but with a triangle. A right triangle with the right angle at the CB hem was used. The straight grain was at CB, and as it moved around the body, the CF grain was true bias. The top of the point was cut off, and a large standing collar was allowed to form. She had added bound slits like welt pockets for the hands, with cuffs inserted, which looked almost like pants cuffs. It buttoned in the front.

A jacket by Madame Grés was shown during the slide presentation which was also a triangle, but instead of one which was allowed to fall down on the body, this one was placed at the waist and raised up to form the jacket, a waist-length, fairly fitted style with lapels and collar cut in one. The original was in doublecloth wool. The point of the triangle (snipped) was the waist, and the sleeve seam was along the shoulder and top of the arm. There was a cut on lapel/collar, and 2 tucks were taken under the sleeves to reduce bulk. It was a darling design, and Dr. Parsons had a muslin pattern she'd made of it. It was just fascinating to see all the different things, and where they start from.

Jean Parsons also showed us photos and eventually the garment she and another designer had made from digitally printed fabric. It began with a circle, which was slashed for the shoulder line and underarm line. Two of these circles were sewn together to form the garment. The top of the circle (above the shoulder line) was like a faced scarf collar. The side seams below the waist were unstitched, but did have an extra 1/2 circle inserted on each side of the front and back. This was in a lightweight printed silk, while the body was in a lightweight wool gabardine. It was an amazing garment, and I can see how it would be easy to become fixated on geometric designs and their possibilities. That's actually her research focus now, and she's going back through a lot of collections to see what basic shapes things began with. It's not always straightforward, and for instance, at the Met, although they allow scholars to see and photograph and annotate their collection, they are not allowed to touch anything, even with gloves. The staff will bring out the garment and they'll turn it as you wish, and measure between different points, but you absolutely cannot touch.

Dr Trout brought out a Chipmunk Coat for Dr Parsons to see. It's a donation, and the man who gave it says it's either a Cashin or a Trigère, but he's not sure which. It's actually just a lining, as it was a white wool swing coat with a button-out lining including a hood, made of chipmunk fur. It's a beautiful thing, but it had to take around 150 chipmunks! Apparently, both designers made coats of this description in the 1950's or 1960's, but there are no photos that help, and the lining doesn't have many distinctive details that would make it easy to tell. Quite the mystery.

When we chose our fabrics, I knew I wanted to do a coat with the heavy, 2 sided fabric I chose, and I first draped muslin to get the collar and lapel shape I wanted, and to see how long a piece of fabric I should cut. One of the hardest things was marking the fabric, as nothing wanted to show up. I finally thread-marked with red thread, and even that blends into the right side pretty well.

One thing I was worried about by this point was whether I was going to get far enough while I had help and easy access to answers to my questions, that I would be able to finish up by myself. Cutting the armscye was kind of thrilling, and it was freehand. It appears to be very nice, though. One thing that has really saved me about this whole thing is that the fabric is extremely forgiving.

I did pin the back/sleeve piece in last night, and it actually works, and I tried it on (with only a little stabbing of myself in the process) and it's so much nicer than I thought it might be. It has a raised-waist look, and I think it has a somewhat Medieval feel to it. The front armscye seam looks so much more perfect than I had dared to hope, and the back is a kimono sleeve, so there's no seam, but the "waist" seam in the back looks nice and straight, and I'm just rather thrilled with the whole thing. Now to sew it together, figure out a nice seam finish for the inside, and I'm planning to do some kind of lining of the upper back and the sleeves to make it easier to get on and off.

I will have to figure out an edge finish, and I'm thinking binding, and possibly leather or Ultrasuede binding. I think a couple buttonholes will be necessary too, and right under the bust appears to be where they should go. It's a good thing I didn't have to split the fabric with anyone, as this took every bit of it.


Photo Link Collar/Fronts/Lower Back ready for Upper Back/Sleeve insertion.


Photo Link Upper Back/Sleeve pattern muslin.
CB is at the bottom with neck at the left and waist at the right.

Sunday, April 15, 2007

Draping Workshop

Well, this has been a wonderful weekend. Great fun, and very hard work altogether, which is always great, and I feel like I really learned a lot. Dr. Trout and Dr. Parsons are both fabulous instructors, and they were able to push us through a lot of learning quickly enough to get to work on some things and actually experience draping a garment.

A special treat was that Dr. Robert Hillestad, of the Hillestad Textile Gallery was one of the workshop attendees, and it was great fun to see how he worked, and he was so very gracious and kind besides. Today, he showed us some of the things he's thinking of using in a new exhibition he'll be giving a year from now, and a group of hats from his days of teaching the millinery classes.

Yesterday we started by draping half of a paper yoke front and back on a dressform, creating a whole pattern from the halves, shaping the lower edge of the yoke, and then adding paper to the yoke to create a garment shape. The paper of course doesn't drape like fabric or muslin, but it's a great place to learn the basic techniques. Here's a photo of my paper drape along with one of my classmates. Dr. Parsons unfortunately moved behind the form just as I took the photo.


Photo Link

After the paper draping, we viewed the Gallery exhibition as a group, and were told to pay especial attention to the two capes in the show. The Cashin cape is a circle, and the Trigère cape is a triangle. We were to drape a circle cape. There was also a short cape by Norman Norell that caught my eye, and it was a circle as well, with a little shaping.

After we draped our capes, including attaching a mandarin collar, we saw a slide presentation on interestingly draped garments, mostly Cashin and Trigère, but also some Madame Grés garments, which were wonderfully inspiring. She did a jacket from the same triangle used for the Trigère cape, but with the point at the bottom rather than the top. A completely different effect, and wonderfully ingenious.

There was also a Madame Grés coat that had very interesting lines, and unusual sleeves in particular, that I liked a lot. Dr. Parsons had draped her own pattern from photos and measurements of the original, and had a coat in progress, with the shell completed. I got to try it on, and it was just lovely. I also got to try on her version of the Cashin Noh coat. A pattern for this was shown in a Threads magazine from 1990 I believe.

We then were told to look at a large group of fabrics on a long table, and choose two. One malleable, and one stiff. I chose a lofty stable knit in autumn colors with moss green on the back, and a brocade in cream/gold/green which is fairly stiff. I didn't actually get anywhere with the brocade, although I'd like to attempt something like the Norell cape. He had a skirt with it as well.

We spent our time individually after this, except for a couple of demonstrations of Cashin-style leather binding and bound buttonholes/welt pockets. We also each had to tell what our plan was for our fabric, show what we'd done so far. This was really fun, and helpful, as there were so many different ideas and plans that it was quite inspirational just to see what was being done.

The knit I chose seemed to call out to be a coat. It's quite heavy, and I'm sure it's at least partly acrylic, and has wonderful drape, yet quite a bit of body. I first draped some muslin to get the lapel shape I wanted. I serendipitously slashed the fabric vertically at the side seam, and let the back part fall to a horizontal, which gave a great shape, and very nice drape, so I decided to use that shape for the coat, and to add the back above the waist and the sleeves separately. In the following photos, you can see what has been done. I draped muslin over the knit to make a pattern for the back and sleeves. The sleeves are very like the Madame Grés coat that I liked. They are cut in one with the back, and the seam is at the top, in line with the shoulder seam. The sleeve wraps around the arm to the front and connects at the top. Thus the back is a kimono sleeve, and the front is a modified set-in sleeve. I know this fabric will shape beautifully, and setting in a sleeve will be no problem, but just for extra good fortune, I noticed that once the coat is worn, the sleeve seam will be covered by the collar anyway.

In the photos below, you'll see the coat on the form, with the muslin attached. The muslin hasn't been cut to the sleeve's length, and there's also a lot inside the sleeve, as I just rolled the excess up and pinned my seam where it needed to be. The sleeve will have a turnback cuff, to match the lapel. After taking the picture, I carefully marked everything and took it apart, cutting the the excess muslin off of the sleeve pattern.

I'm rather pleased with the prospects for this, and although I'm not absolutely sure it's going to fit me, (rather than the form) I have hopes that it's going to be pretty forgiving as to size. There hasn't been any actual sewing on this yet, but I hope to get right to it while everything's fresh in my mind.

I would take a workshop like this again in a heartbeat, and I would heartily recommend it to anyone as well.


Photo Link
Coat front with sleeve attached.


Photo Link
3/4 View


Photo Link
Semi-Back View


Photo Link
Back view with 1/2 muslin draped for back and sleeve.


Photo Link
Close up of Back, with collar lifted to show the top of the piece.


Photo Link
Front with collar lifted to show the sleeve and shoulder seams.

Friday, April 13, 2007

Tools for a Draping Class

Posted by Picasa


I'm signed up to take Angles & Details: A Draping Workshop sponsored by the Robert Hillestad Textile Gallery at UNL this weekend, and these are my supplies, gathered from my sewing tools, to fill the required list they sent.

  • 6 yards muslin
  • fabric shears
  • paper scissors
  • tape measure
  • clear plastic ruler
  • a healthy supply of dressmaker pins
  • colored string or yarn (about 4 feet)
  • needles
  • sewing thread in 2 colors
  • fabric marking pencil or chalk
  • notebook would be helpful
  • sharpened pencils

As you can see, I've fulfilled all the necessary requirements, including a few things I added, such as a small scissors for snipping threads, and a Chalkoner as well as a piece of tailor's chalk and a couple chalk pencils. You never know what's going to be easiest to mark with in any situation.

I must confess, I've never bought muslin before. I usually use bargain fabric to try patterns, but I wanted to do this right. I am following instructions, at least for now.... I assume the creativity will come later.

I'm a little nervous about this class, although I'm very excited as well. I've never done anything quite like it, and when I saw this notice, I immediately knew that I was interested.

Description: This is a day and a half workshop designed to explore the potential for using simple geometric shapes to form innovative garments. The process will move from paper to fabric. Participants will form garments by shaping, cutting and pinning fabric directly to the dress form. Some sketching will be done but will not be the primary focus. Outcomes might include wraps, rain capes, skirts or innovative jodhpurs. The aspect of closures and trims will be explored in keeping with the innovative spirit of the designers represented in the exhibition. Although a refined garment may not be produced in a day and a half, the goal will be to complete samples and a functional prototype.

Who should take the class: Individuals interested in alternative shapes for clothing and those interested in working with fabric directly on the dress form. No draping experience is necessary. The ability to use a sewing machine is a pre-requisite. May be of interest to quilters and weavers, and others who wish to explore wrapping textiles around the body. The workshop will focus on structure, not surface embellishment.

Biography: Instructors: Dr. Jean Parsons, Associate Professor Textiles and Clothing, Iowa State University and Dr. Barbara Trout, Professor, Textiles, Clothing and Design, University of Nebraska. Both instructors have numerous years of experience in apparel design and have earned national and international recognition for their apparel design work.

Monday, April 09, 2007

Bunnies, Pants and Ornament


This is a darling, exquisitely made wool felt bunny mat given to me this Easter by my dear friend, Linda, from Maryland. We've known each other since college, when we worked together, and have always kept in touch, and remained close through our shared interest in textiles and textile-related activities. I feel really honored to receive this, as she's very busy with designing and making many wonderful art quilts and other articles, to say nothing of a busy family life. Talent drips from her fingers!

I made another pair of pants from my TNT Double Burda pattern, but I fell for some stretch woven fabric, and once again, my results with this type of fabric are less than thrilling. Barely acceptable is what I'd call them. They're going to be fine around-the-house/run to the grocery store pants, but not quite what I'd hoped for. It was not inexpensive fabric either, so I'm not very pleased. I am telling myself once again that this is the last time I will buy stretch woven (lycra content) fabric that I expect to act in a normal fashion. Lycra is for knits as far as I'm concerned. I know others love these fabrics and have great luck with them, but for me, they look like I dressed out of the ragbag, and I can do that look (if I want to) without making something new!

 
Posted by Picasa

I have subscribed to Ornament magazine, and my first issue is just wonderful. Really my cup of tea, with a lot of clothing, wearable art things that are really wearable, surface design, fantastic jewelry, etc. I would recommend you pick up a copy and take a look. It's inspirational if nothing else.

I also began another pair of pants. Same pattern, but with a drawstring variation that I like for summer and spring. The fabric is a silk which looks a little like a corduroy, but is in actuality, a flat weave. It is a perfect coordinate for a jacket fabric I have. It's a pale gold, almost a cream, and it has the perfect weight to hang beautifully, I think. I hope so anyway. I would say that I'd finish them today, but I have to put everything aside, and finish getting ready to host a music club tomorrow night. I'm just sorry that it's too cold to wash the windows. And if you believe that,....

Friday, March 30, 2007

Twisted Flower Sock II


Photo Link

I finished the first Twisted Flower sock last night. I think the pattern is truly spectacular. The motif placement is just perfect, and the pattern is very exact so that you should get exactly the same results as the pattern photo. I have started on the second sock already, and although I do have to continually refer to the charts, it's still a very quick knit, and quite enjoyable.

The pattern is from CookieA. She has quite a few that are very interesting.

Monday, March 26, 2007

Twisted Flower Sock


Photo Link

I downloaded one of CookieA's new sock patterns the other day, and began to knit using elann's Esprit sock yarn, which is cotton/elastic, so nice and stretchy, which cotton yarn certainly is not by itself. It's actually a very pale green. I like how the pattern is knitting up, and the instructions are extremely complete, giving you charts for the leg, heel (which is also decorative) and the top of the foot. No excuses for mistakes, I guess.


Photo Link

I also managed to snag a photo of my frog! I'm so thrilled to have a real frog hanging around the garden and the ponds. He likes to sun himself on the pond heater, so I'm a little loathe to take it out, even though I think the cold weather is well and truly gone. Right after I took this picture, I tried to move in for a little closer one, and he dove off the heater and swam away very quickly. Shy, that's my frog.

Friday, March 23, 2007

Flat Seat Adjustment Success


Photo Link

I finally hemmed the pants I tried Ann Rowley's Flat Seat Adjustment on, and I rather like them, to say nothing of the fact that the alteration is just pure magic, in my opinion. I wanted a pair of pants that I could wear pretty high heels with, and the ones I have on in the photos are about 3 1/2", and the hems just almost brush the ground, so it's best if I stand up very tall. I had drooled over some of the cuffed pants in the runway shows last fall, and I'm finally getting to doing a pair. I haven't had cuffed pants for years, and in fact, unless I made them myself, if I bought a pair of pants with cuffs, they would almost always be immediately let down so that they'd be long enough, and there went the cuffs.


Photo Link

This fabric is a polyester which is supposed to imitate linen, and it has a little shine to it. I like the color, and it goes with a lot of things I have. I think they'll be nice clear into summer, with heeled sandals. I just think there's nothing more swishy feeling than really long pants, with heels.

I think the folds in the backview are from the way I'm standing, but perhaps not. I never noticed them when I was looking in the mirror, but that doesn't always mean much.


Photo Link

This is my favorite Double Burda pants pattern, which is two Burda patterns I've put together to get what I want. It has a side invisible zipper, side pocket, and Hollywood waistband.

Tuesday, March 20, 2007

Yarn Order Arrives & Pattern Alterations

 
Posted by Picasa


This is the yarn I ordered from Bendigo last Tuesday. I think it is amazingly fast to get yarn all the way from Australia to Nebraska in less than a week. They have always had very fast service though, so I wasn't terribly surprised, and I did hope it would arrive soon.

The dark blue (Midnight Tweed) is much more heathered than it appears in the photo, and is for the cabled sweater pattern shown in the previous post. The dull purple is Agate, and will be a Norah Gaughan Ram's Horn Jacket. They are both wool. The Latte is Cotton, and will be a Norah Gaughan Spiral Shell.

Ann Rowley, whom I count a dear friend, and who is a very, very expert seamstress, posted her Flat Seat Adjustment for pants, along with photos of the process, on Stitcher's Guild, on her Ann's Pearls of Wisdom board. I immediately had to try it, and I've been anxious to start making some pants again, so the timing could not have been better. I did the pattern alteration, and cut on Saturday night. I sewed the pants up yesterday except for the hems, and am hoping to finish them tomorrow. I am very thrilled with the results of the alteration. It seems to be just about perfect. Very, very thrilling!

Thursday, March 15, 2007

Bendigo Yarn

Since I keep talking about Bendigo yarn and how much I like it, but they have no website, I thought I'd just post scans of their color card to give you an idea of it. Do order one for yourself so you can see it in person, as you know how unreliable monitor colors can be.

Click on the 2 pictures and you'll get nice large ones that you can really see. The colors look pretty accurate to me here, but the darker ones are hard to see anyway.


Posted by Picasa

I ordered 2 shades of Rustic (lower left group in top photo). Midnight Tweed, 5th from the bottom, which doesn't show well at all, for a Christmas gift sweater. I ordered Agate, 15th from the bottom, for a Norah Gaughan Ram's Horn Jacket for me. It's in her Knitting Nature book. I also ordered some of the Cotton yarn (right side of top photo) in Latte, 7th from the bottom, for a Norah Gaughan shell from the same book.

I've begun swatching for the Christmas sweater with some of the Rustic I have left from my cardigan, as it's the same yarn in a different color, and for once in my life, I'm using the suggested needle sizes (US 1 & 4) and getting the specified gauge. Here's a link to the pattern I'm planning on using, which is pictured below. There are directions for both adult and children's sizes.

Tuesday, March 13, 2007

Modeling the Bendigo Cabled Cardigan

I must confess that I was so excited to have finished this sweater yesterday that I couldn't wait to show it off, even though I couldn't get photos of me wearing it until today, which was the most gorgeous day. 84 degrees, which is just almost unheard of in March. So, I suffered a little in a wool sweater, but it was a beautiful day, and I am by no means complaining. So, here are my photos. That's my twisty wisteria trunk behind me. It's starting to put out small flower buds, and I'm hoping for a lot of flowers by May.

Photo Link


Photo Link


Photo Link


Photo Link

First Flowers


Crocus


Helleborus Niger, Lenten Rose 2007

Spring seems to be coming very quickly now. I saw a frog sitting on one of my pond heaters this morning. That made me smile!

My Favorite Knitting Bag


Photo Link

Some friends and I have been discussing what makes a good knitting bag.

I've used a lot of different bags that have come my way, although the only "official" knitting bags I've ever had are the ones with the wooden framework that will stand up for you.

I like those, but this tote bag that I got from The Nature Conservancy has become my favorite. I did not expect this, and originally thought it was too low, as I'm used to a taller bag, but this is actually very handy, and the double row of pockets along both sides of the bag on the outside are just invaluable. You can see the set of pink double points in one of the inner row of pockets, and the green pencil is in one of the outer pleated pockets. Everything I need is right at hand.

Monday, March 12, 2007

Bendigo Cardigan is Finished


Photo Link

This is the finished Bendigo cardigan. It's from a pattern they sell, and the yarn is their "Rustic" wool in the color Peppercorn. I am quite pleased with the way it turned out. The fit is great, the sleeves are the perfect length, and it's a color I like very much. It's a gray-green, but has a blend of colors in it, including green, tan, rust, teal, pink, and a few others, but it all reads gray-green.

I added the central strip of pattern stitches to the back. It was written just like the front pattern, but with a strip of reverse stockinette down the center where the buttons are in the front, and I thought that was kind of boring. Here's the back.


Photo Link
I added the central diamond cable pattern, and the 2 twisted cables, one on each side of it.

I see that I started swatching for this sweater on the 31st of December, 2006. All in all, not bad for a fairly complex knit. Actually, the pattern was quite simple to memorize, and except for the shaping, it was mindless knitting. The real killer was the buttonband. It called for you to knit the button band, sew it on, (slightly stretched, I hate that instruction. It's so hard to get it just right) and then begin the buttonhole band, matching the buttonhole spacing to the sewn-on buttons, sew it on and sew a seam at CB. I couldn't see why I couldn't just continue around the neckline and do it all in one piece, eliminating the CB seam. It worked quite well, except it was very, very tricky to get the band sewn on just right, so that it wasn't too tight or too loose. I think I stitched it on several times, and ripped more than anything I've ever knitted, even though I was buttoning it on as I went along, and finally kept stopping every few rows to stitch it on, and holding it up to make sure it wasn't going to pull or sag. It was quite the challenge, but definitely worth getting it right.

Wednesday, March 07, 2007

Coral Marfy Blouse is Done


Photo Link

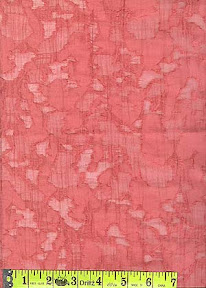
I finished the coral cotton/silk Marfy #1101 blouse last night. Actually it was all done on Monday except the buttonholes and buttons. This version fits quite differently than the last one I made, which was a chiffon, and is more fitted looking. This fabric has lengthwise crinkles or disorganized pleating, and it gives it quite a stretch factor. I knew it was going to be much more casual in look and in fit, and that's fine. The sleeves turned out very long, and since the chiffon sleeves were just right, that was a surprise. This has the cuffs coming down over my hands, but that is about how they're supposed to be, but I don't think that's really my style. I simply made fold-back French cuffs, which I like, as the line of the cuff echoes the line of the collar. I had buttons on hand which were the correct size, and a perfect color match. Now I wonder if I should have used something with a little more contrast. It's a little plain looking, but maybe that's a good thing. I can always change them if I want to, I guess.

This should be a nice cool blouse to wear this spring and summer, even with the long sleeves. They can always be turned up too.

Here's the pink interfacing I used.

Photo Link
Lower Right is the fused interfacing.
Center is right side of facing with interfacing fused to it.
Upper Left is unfused fabric for comparison.

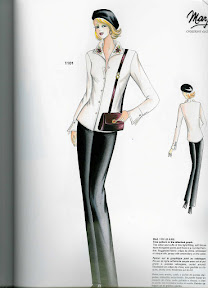
Here's the pattern illustration from Marfy.

Photo Link

Sunday, March 04, 2007

Pink Interfacing

Some time ago, during one of my shopping trips to the Pendleton Factory Outlet in Omaha, I bought a 5-yard package of pink fusible interfacing. We're not talking baby pink either. This is FUSCHIA interfacing. When I bought it, I had no idea when or on what, or even whether I would ever use it. I just knew it was unique, a good buy, and I'd probably never have a chance to get any ever again. I've purchased a lot of findings/notions/underpinnings from Pendleton, and every one of them has been top quality, to say nothing of being absolutely ready for the needle. It's a wonderful thing to know you don't have to preshrink your lining or whatever because someone else has already done it, and done it very well.

From Patterns

After finishing my jacket, I decided to make something that would be actually at least semi-fast, and probably successful. I knew when I finished the animal print chiffon Marfy blouse last August that I would want to make it again. It's just a good style for me, and it was a pleasure to sew.
From Fabric
I cut one out tonight from this Cotton/Silk fabric from FabricMart, and realized that since part of it is fairly sheer, my interfacing would show through at least to some extent. I tested several sheer interfacings, but they all showed through with a lighter color, even if they were ivory. I didn't really expect the fuschia interfacing to work, as it's a much stronger color than the fabric, but it really seems to just disappear, which is perfect. I hope to get some sewing done on it tomorrow, but I'm ready to roll, as it's all cut and fused.

Now to change thread on my serger.

Friday, March 02, 2007

Cream Marfy Jacket


Link to Photo

I finished my jacket made from Marfy 9650. The pattern is from the Fall/Winter 2005/06 catalog. The fabric is a very heavy cream cotton with metallic embossed designs. I still think it's a really pretty fabric, but it was very hard to work with. It had no give to it, and easing was just about impossible. I had to lower the sleeve caps a fair amount to get the sleeves set in. I think they turned out fine, and they're very comfortable, which worried me, but it certainly could have been easier. The raised, embossed designs added to the stiffness of the fabric as well as making it somewhat difficult to do handstitching. The needle just didn't want to go through those areas.

All in all, I think it turned out well. I made some changes, as you can see by looking at the design illustration below. I didn't do the contrast collar or topstitching, and I decided against the pocket after pinning it on several times and attempting to adjust its position to someplace where it would look good. That spot didn't seem to exist, so I ditched it. The only topstitching on the jacket is some edgestitching along the collar and lapel edges. I used a Madeira Rayon thread that was a matching cream with tiny flecks of red, blue, and green, which are almost unnoticeable in the end, but the color match was very good anyway.

I think I have enough fabric left to do a matching skirt if I wish, but I'm not sure I really want one. Perhaps when I have some distance from working with this fabric, and have forgotten my troubles with it.... Here is a side view.


Link to Photo

The design called for a double button frog closure on an angle, and I did a closure made with 2 mother-of-pearl flat rings, a vintage button, and a cord made from suede and linen yarns. I was afraid it wouldn't be too practical, but it seems to hold very well, and it's easy to get the placement correct while wearing it. As with most double-breasted styles though, it looks better closed than open.


Link to Photo

Here's the pattern illustration.


Link to Photo

Another Snowstorm

From Weather


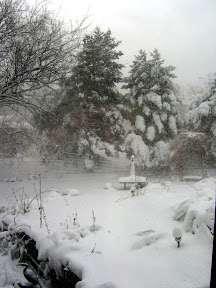
Yes, another snowstorm. I really don't remember another winter that has given us so much snow, and seemingly one storm after another. In fact it's snowing again tonight, and blowing 45-50mph too. This picture is actually from yesterday, when we got 8"+ of very heavy, wet snow dumped on us in a big hurry. I think I'm just tired of it.

Tomorrow, I'm going to a Spring Salad Luncheon! It's supposed to be sleeting, so that should be nice.

Monday, February 26, 2007

It's Nice To Be Back on Track

I finally got the lining cut for the embossed Marfy jacket, and hooray, I feel like I'm finally back on track. It's going in rather well too. I stopped tonight when I felt like I was getting tired, so at least there were no silly mistakes made. That's always a plus.

The Bendigo cardigan is getting closer to a finish as well. I'm halfway up the second sleeve. The weather has been great for knitting, as well as sewing, or anything that keeps one in the house.

It snowed last night and this morning, and we were snowed in. Our drive finally was cleared about 10pm tonight.

I also made my very first ever peach pie this evening. I'm usually an apple pie girl, but Pearle loves peach pie, so thought I'd try it. I got out the old Farm Journal Pie Book, and I have to say, I think peach pie might be my favorite now too. It's pretty wonderful! I got to use my new Microplane nutmeg grater too.

Tomorrow night is a Sewing Guild meeting, and the program is unique doll making. I've never made a doll, but it should be interesting.

Friday, February 23, 2007

It's Been A While

Still here, just quiet. I've been getting quite a bit done on the Bendigo cardigan, and in fact I just started on the second sleeve tonight. I'm really pleased with how it's turning out so far, and once I get the sleeve done, there will be only the blocking, assembly, and then picking up the button band. Practically done!

I've also been working, albeit slowly, on the Marfy jacket I'm making from the FabricMart embossed cotton. That fabric has been a struggle all the way. It's kind of thick, has no give whatsoever, and acts kind of "lumpy" at times because of the embossing I think. The sleeves are what gave me fits. Up to that point, things were going well, and I thought I was on track for a quick finish. I got the sleeves in, and although I did get them set in with no actual puckers on the sleeve side of the seam, the convolutions of the seam allowance came right through and because of the density of the fabric, made it look as if there were puckers on the sleeve itself. If I took a sleeve head and really held it in tight, they went away, but in real life, it wasn't working.

I checked a lot of my books, and the best information on what to do came from Sandra Betzina's Power Sewing. I lowered the sleeve cap, quite a bit actually, and they went in much more easily, and they look and feel fine. The more I thought about it, the more I realized that I was doing about what she suggested for UltraSuede, which this is not, but it sure acts like it.

Hand basting was difficult as well, as no matter how fine the needle, it's very difficult to get it through, and if you happen to hit one of the embossed spots, it's tougher yet.

I think I did a poor job of matching the fabric and pattern. The fact that this jacket has curving lapels makes it difficult with this fabric, as wherever you have an embossed spot that extends into the edge seam, it doesn't want to lie smoothly, it wants to make a small "point" instead. Maddening, but with pressing and patience, I managed to get it right. I am afraid however, that if I topstitch or edgestitch, it will just bring the points back with a vengeance. Hand stitching holds no temptation with this fabric either. I think I'm just going to finish it, and be done. It's a lovely fabric, and quite busy by itself, so it really doesn't need even the extra embellishment of edgestitching.

Anyway, I'm up to the lining, which I haven't cut out yet. I also need to figure out an interesting, and unique closure. The pattern suggests a single frog with 2 buttons, which looks very nice. I may look for some unusual buttons or something. Actually, I have a couple of drilled, polished stones that might be just the ticket. I'll have to hunt them. They're from my LYS, which also carries a wonderful button selection.

Sunday, February 04, 2007

Marfy Dress Photos


Marfy 1128

Here is the finished dress from Marfy #1128. It was a little hard to photograph because the matelassé is such a dark brown. I'm actually very pleased with this, and although I doubt I'd make another like it, it was quite fun to do, and it really took me in a new direction. I love the chiffon on this dress.

The back view is below. It's about 1" higher in the back than the original design, as I raised the whole thing at the shoulders. I recut the front neckline to the original depth, but I left the back, as I felt a lower back would do nothing for me, and I think this gives the same effect, with less chance of problems.


Back View

Here's a close up of the buttons I used, and you can see a couple more construction-related photos here.


Button, Cuff & Placket

Marfy Dress Today; Photos Tomorrow

This afternoon I finished the Marfy dress, #1128, that I've been working on for a while. No photos yet, as it was too dark by the time I was done. It really turned out quite well, and I'm pleased with it, but I must say, I'm not sure just how soon the occasion will arise to wear it. When it does though, I'll be ready.

I was very worried that I might not like the look of the printed chiffon with the matelassé, but I think it's fine. The design calls for fancy buttons, and even says "jeweled" buttons, but I looked at what was in my button stash, and it turns out that one of my favorites from the collection I was given at Sewing Guild a couple weeks ago is the perfect thing for this. They're the brown domed buttons with brass dots. They're quite large, and "important" looking. There is one at each end of the chiffon scarf/collar, and one on each cuff. The cuffs close with snaps, as I didn't want such large buttonholes in them. Here's the pattern illustration.


Marfy#1128


On the knitting front, I decided how to adjust the stitch pattern for the back of the cabled Bendigo cardigan I'm knitting, so I'm ready to knit during the Super Bowl, if necessary, and I'm sure it will be. The original pattern had a panel of plain reverse stockinette in the center of the back, with a pattern panel on each side, but I wanted something with patterning all the way across, so I needed to adjust the panel placement slightly to get everything to work out right. I'm done with both fronts now, and I'm pleased and also slightly surprised at how quickly it seems to be going.