Showing posts with label Vintage. Show all posts

Tuesday, February 22, 2011

Fashion Exhibit at LACMA


Fashioning Fashion at LACMA

There's always something fun to see in Southern California, and this was fun to see. If you're anywhere near the Los Angeles County Museum of Art, you should try to see this exhibit. It's really fun to see all the gorgeous garments close up. They have mirrors behind some of them so you get a 360 view, too. We went yesterday since it was a Target Free Holiday Monday. I took a few photos at the fashion exhibit.

The first two are the same dress. It's early 20th century, and I love the trim, besides the general style of course.
From Drop Box


From Drop Box


This dress has wonderful shaped collar and cuffs in velvet.
From Drop Box


This shows the cuffs, and guess who, in the mirror?
From Drop Box


A gorgeous emrboidered velvet kimono with a Fortuny-pleated skirt peeking out below. I have to think that the reason we only get a glimpse of the Fortuny dress is that it's in bad shape. What's there is gorgeous, though.
From Drop Box


This is a hat I just adore. Real gold embroidery.
From Drop Box


You wouldn't know it from my photos, but there were quite a few men's garments as well. Not quite 50/50, but probably at least a third were menswear. Most were highly embellished and embroidered, and in fabulous fabrics, so they were well worth seeing too.

There's a beautiful book available about the exhibit. It has great photos of the pieces, and lots of explanation. If you can get a look at it, you'll enjoy it.

We met a new friend at the exhibit too. It seems one can recognize fellow-enthusiasts. Hi to Mary from Fort Collins, Colorado!

Saturday, May 24, 2008

First Glove is Done


Photo Link

Here's my first glove, and I think it's not bad for a very first try. I used an opaque plaid knit. I placed it on the bias, as you would for a woven fabric. It would have been fine either way, but I thought the plaid would look nicer on the bias. There are definitely some changes and refinements I will make in future, beyond what I already did.

The finger length has to be customized naturally, and one thing I've learned from this is that I have fairly small hands. My sister has such tiny little hands and wrists that I've always thought of mine as large, but apparently not when compared to the average. I had to shorten all the fingers, but the little finger was shortened a lot. I think I will shorten the length between the base of the fingers and the top of the thumb if there is a next pair. This intrigues me since I also have to shorten bodices between the shoulder and the bottom of the armscye. It seems somehow symmetrically related, although I'm not sure it really is.

This was View D, which is the plainest of the 6 views in this vintage pattern. The only difference is in the cuffs. These are just a cut-on cuff, which is nice, and I saw no reason to fuss when I was mainly doing this pair as a test.

There is a lot of handsewing in these. That may seem obvious since they're completely handsewn, but they advise you to baste the seams, then stitch them with a backstitch, then trim the seam allowances and hand overcast. I didn't overcast on these since it's a non-ravelling fabric, but it's still a lot of stitching. It really goes quite quickly though, since the seams are so short.

I'm not completely happy with the shape of the fingertips. This is a tricky part, as you're joining the front and back of the fingers as well as the fourchettes between the fingers. Just now while typing this, I realized what I need to do to make them work much better, and it's not really in the instructions. They're very vague at the point of finger closure. I have some really wonderful Italian leather gloves that are unlined, and beautifully fitted, and the fourchettes are very tapered at the top, and the front and back come together at the top by themselves. I believe I will try this method on the next one, and probably come back and change these. Live and learn.

Here's the palm side.

Photo Link

Here's the inside of the glove after the thumb has been attached and the nips stitched on the back of the hand. You can see the transfer marks and the fact that the fingers have not been individually cut yet.

Photo Link

Tuesday, April 22, 2008

2-Piece Floral Dress


Photo Link

I finally finished this dress, and I'm glad to be done with it. Not that I didn't enjoy working on it, but I've been able to spend almost zero time sewing in the last couple weeks, and I was so close to done it was just killing me not to finish. So, here it is.

The fabric is a silk/cotton blend with an interesting weave that makes effective use of the fact that silk and cotton will take dyes differently. It makes the print look almost like a woven design, and gives it a watercolor effect. Yes, it's a really, really, really large scale print, but it's so large it almost reads as an abstract, and I like that. The fabric is from Nancy Erickson, and I borrowed her idea of making a 2-piece dress. I did not use the suggested princess-seam top however, preferring a darted, cut-on-sleeve top that I've made before. The original pattern is Vogue 2719 which is a Vintage Vogue dress that's OOP. I used the bodice as a blouse previously and it's a real favorite. I redrew the neckline for this to make it a little dressier than a shirt collar.

When I ordered this fabric, I assumed I was going to be using a princess-seam sheath style top pattern, and planned accordingly. As I mentioned before, I really had a hard time getting this top out of the fabric I had. I didn't have really any choice in print placement because there was one, and only one way this fit on the layout. After stitching the top, I really didn't like the look of the CF seam with the print. I came up with my triangular appliqué idea, and like it, then decided that adding a bow would be even better. How can you go wrong with a bow?
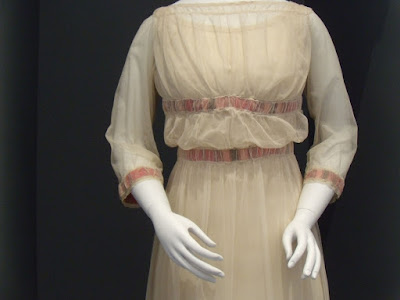

Photo Link

I underlined the entire thing in silk organza, which gave this a lot of body. This fabric has body of its own, and the result is almost a spongy feel, and I think it holds the style very nicely, especially the skirt. I was a little hesitant about lining this as well as underlining, because of the thickness of the fabric and underlining even before lining, as well as the fact that it's a Spring/Summer outfit, and I didn't want to add warmth. And, I'm just not a "line everything" kind of girl. I like to go on a case-by-case basis, and I rarely line tops. Because this top pattern was altered with my saran wrap block, it has a really nice fit in the neck and shoulders, so I knew I could get away with just piping the edges and hand overcasting the piping to the wrong side. There's no peek-a-boo problems with the inside showing here and there, and it makes a really nice clean finish. Here's the top inside-out. You can get a better look by clicking on the photo link and viewing the Original size. This is true of all of the photos.


Photo Link

The skirt is drafted from my favorite straight skirt, and is the same as the green skirt I did as a trial. It looks quite different, but it's all in the different properties of the fabrics, not the pattern.


Photo Link

And here's a side-front view.


Photo Link

I did contemplate a belt with this. I took photos with and without, and although I like the belt, it just makes me look awfully short-waisted, and I think this is a more graceful look. It's amazing how much easier it is to make a style decision while looking at photos rather than when looking in the mirror. Everyone says this, and it's really true.

Monday, April 07, 2008

A Blast From the Past


Lately, every vintage pattern on Summerset's blog brings back some memory for me, but this one is special. The sleeveless, long version of this dress was what my college choir wore to perform. We all professed to hate these dresses with a passion, but they were actually amazingly well chosen for their ability to look fairly decent on everyone, no matter what size or shape. The skirt was very graceful, and the style was very forgiving. We didn't know enough to realize it at the time. I think I still have my dress, although it's unhemmed now, since after graduation I loaned it to a new choir member even taller than I am, and when I got it back, the hem had been carefully taken out and pressed flat. They used these dresses for at least 15 years.

The other real beauty of the dresses was the fabric. It was just a medium blue polyester crepe, but it was indestructable. I still remember being in Hawaii on tour. We sang in a bandshell right across the street from Waikiki Beach, and we wore our gowns and the guys wore their tuxes. We were staying at a local college (it was Christmas break) and we didn't want to have to go all the way back to change, so we girls all wore our bathing suits under our dresses and when we were done singing, we took off the dresses, popped them and our shoes into a tote bag, and sauntered over to the beach. Meanwhile, there were about 40 guys with tuxedos in garment bags looking disgusted. Once in a while, we get the better deal.

Anyway, you could leave your dress crumpled in a bag all day and when you took it out, it looked just as good as before. Hooray for polyester! It certainly has its uses.