You can see that I used a 'belt' at centerfront, with covered buttons to attach it, to control the fullness that I had to add to be able to wear this dress in a woven, totally non-stretch fabric rather than the knit it was designed for. There's also a zipper on the side seam for ease of getting it on. You still have to pull it over your head, but this helps.
Showing posts with label Dress. Show all posts
Tuesday, September 11, 2018
Vogue 1250 in a Woven Cotton (for Carolyn)
You can see that I used a 'belt' at centerfront, with covered buttons to attach it, to control the fullness that I had to add to be able to wear this dress in a woven, totally non-stretch fabric rather than the knit it was designed for. There's also a zipper on the side seam for ease of getting it on. You still have to pull it over your head, but this helps.
Thursday, August 16, 2018
Photo Day
As some of you know, I'm going to be the Presenter at the Kearney, Nebraska Sewing Expo September 21 and 22, 2018. It's put on each year by the Bishop Method Clothing Group of Nebraska, and the Kearney-Area ASG chapter. It's always a wonderful weekend, and I'm so excited to have been asked to present this year! Their flyer will be out this month, and I will put it here in case anyone is interested who hasn't gotten it before.
So as you can imagine, I'm madly getting ready for my classes. I've been working on this for quite some time, and it's getting down to the wire.
One of the things I will be doing is a Trunk Show with many items from my wardrobe. It will be mainly Marfy pattern garments, since that's what I sew most, and like best, but of course, there are others too. When you come across something great, you have to go for it. There will be 4 classes altogether including
Wardrobe Planning & Perfect Proportions
Marfy + Trunk Show
Project Planning for Sewing Success
Saran Wrap Fitting Techniques
I am so lucky to have a sister who's a whiz with a camera. She came over today and we took quite a few long-delayed photos of my projects. Here are a few teasers.
This is Marfy dress 2330 and jacket 3828. The fabric is from Barcelona, Spain when I shopped with the legendary Paco Peralta and Cristina.
Vogue dress 1250 in a woven cotton print. The dress is designed for knits only, but it worked out well with a side zipper and a sightly larger size. I also added the double collar with applique. This was made to attend a summer wedding, and it's one of my favorite summer dresses.
Monday, January 18, 2016
Style Arc Issy Dress with Gorgeous Fabric
As we all know, Gorgeous Fabrics does live up to their name. Ann chooses the most beautiful things for us to try to resist. This is a pique knit print I ordered before Christmas but had planned to use it for spring.
Last week gave us some horrendously cold weather which is still with us, and I decided last night to begin a dress out of this cheery fabric, just to warm up a little. Dresses seem to be what I want to wear lately, and I don't really have many winter dresses, and this is not one either, so obviously my planning is not the best.
I've been wanting to try Style Arc's Issy Top as a dress since my top turned out pretty well. (Apparently I did not blog about that top, although I like it a lot.) I got this pattern as a free pattern-of-the-month from StyleArc with the purchase of the Zoe Pencil Skirt. I have to say, the skirt pattern was not a winner for me. I made it up in a nice wool, lined it, had high hopes for the interesting side seams, and it was really nothing spectacular. However, the Issy Top has been great fun, so I feel like it turned out well either way.
As you can see in the line drawing, it's an asymmetric top with gathers on both side seams, and an unusual draped neckline that looks like it might be loose, but is firmly attached and stays put in this shape.

My dress is basically the top with 18" added to the length, and I just extended the side seam lines at the original angles. I ended up doing one more gathered area toward the hem on the right side.
Generally, I'd have to say I like this, but I think it might be better in a plain fabric, so the ruching would show a little better, and perhaps read as "cool ruching" rather than what I am afraid may be its message, "wrinkly wrinkles". The fashion-savvy will know the difference obviously, but the rest of the population may be flummoxed.
I think this is cute though, and I will probably wear it first for an early "Spring" luncheon in March. Hope it's not snowing and sleeting then!
Last week gave us some horrendously cold weather which is still with us, and I decided last night to begin a dress out of this cheery fabric, just to warm up a little. Dresses seem to be what I want to wear lately, and I don't really have many winter dresses, and this is not one either, so obviously my planning is not the best.
I've been wanting to try Style Arc's Issy Top as a dress since my top turned out pretty well. (Apparently I did not blog about that top, although I like it a lot.) I got this pattern as a free pattern-of-the-month from StyleArc with the purchase of the Zoe Pencil Skirt. I have to say, the skirt pattern was not a winner for me. I made it up in a nice wool, lined it, had high hopes for the interesting side seams, and it was really nothing spectacular. However, the Issy Top has been great fun, so I feel like it turned out well either way.
As you can see in the line drawing, it's an asymmetric top with gathers on both side seams, and an unusual draped neckline that looks like it might be loose, but is firmly attached and stays put in this shape.


I think this is cute though, and I will probably wear it first for an early "Spring" luncheon in March. Hope it's not snowing and sleeting then!
Tuesday, October 27, 2015
Flounced Mauve Dress
Ruffles are not my style, but flounces are not ruffles, and asymmetric designs are always fun.
This Marfy pattern (#3744) appealed to me immediately when I received the catalog, and just FYI, there's a floor-length version that's beautiful and would make a great prom or evening gown. It's a separate pattern, which I can understand, since all of those flounces are redrafted to attach to a longer main skirt. This keeps the proportions correct.
It was somewhat challenging to alter since the bodice is not symmetric, and it also has no 'regular' darts. So I used a combination of a princess FBA and using my saran wrap block to make sure I had made the changes I needed. I think it turned out pretty well, and actually, this was my 'muslin', though I had hopes that it would be very wearable. I think it is.
I used a lightweight matte jersey I got from Kashi at Metro Textiles in New York.
I left all the edges raw. In snoop shopping in NY and Chicago recently, and online of course, I am seeing a lot of this, and if they can do it, so can I. The trickiest part was making the hook and eye at the top of the zipper look neat on the outside since there was no facing to sew it to. I think this works well. It's visible, obviously, but not messy looking. It's stitched through the top of the zipper tape for stability, and to control the zipper tape as well.
Wednesday, October 14, 2015
Marfy 1128 - Autumn Cocktail Dress - Completed
This latest iteration of Marfy 1128 turned out really well, I think. This is the finished look. It's hard to catch the sparklieness of the actual dress without having it be almost impossible to actually see. I got to wear it this past weekend to a fundraising dinner, and I felt very appropriately dressed.
The hem is my favorite part. I love the way it drapes and catches itself up, especially in the back. I changed the back neckline from a very low square back to a higher scoop, which is still fairly low.
I have quite a few inner construction photos for this. The blog photos are smaller than those you can see if you click here. As I think I said previously, I underlined this with a fairly heavy satin lining, almost something you would use for a coat lining. I turned the satin side toward the body, and extended it about 5" longer than the dress hem edge.
You can see how I turned the hem up to the outside on the finished garment photos, but here is the inside of the hem, which comes out very nicely since all the raw edges are inside the rolled part on the outside of the dress.
The original pattern has front horizontal and vertical darts, and gathering at the neckline under a chiffon collar. I stitched the horizontal darts, but used the other ease to drape from the waist up to the neckline. You can see close ups of the neckline and waist draping here.
The facing you can see on the neckline is a folded bias strip of the lining fabric. The neckline stands out in places, as it is supposed to, and the bias band helps it to stay close to the body in any case.
These two photos show the inside front of the body of the dress with the stitched waist tucks.
In the close up you can also see the stitching which tacks the bow in place.
This is the slight flange edge of the sleeve, almost just a facing which peeks out. It's widest at the top, narrowing to nothing at the side seam.
You can see inside that it is also a bias strip, but of the fashion fabric.
Finally, you can see that the extra-long invisible zipper opens the entire length of the side seam. I really have learned that this is not too long a zipper for a dress like this. It makes it so much easier to put on, and without spoiling one's hair or makeup.
Monday, October 05, 2015
Autumn Cocktail Dress
I'm excited about this dress. It's been awhile since sewing has been this much fun, and I'm enjoying it. I'm going to a Friends of Opera Gala fundraiser this Sunday, and I thought I wanted something new to wear.
I'm using a TNT pattern, Marfy 1128. It's a fairly basic sheath dress, but with the gathered neckline under the chiffon collar, it give you a lot of leeway to manipulate the neckline if you don't want the collar. One thing I have learned with this pattern is to use a much longer zipper than I originally thought necessary. This makes it so much easier to get into. I bought a bag of invisible zippers last time I was in LA with Kathi Rank shopping the Fashion District, and so I happened to have a 34" invisible zipper in an acceptable color (dark green), which goes in the left side seam from the armscye to the hem. I probably would not have purchased this long a zipper on purpose for this, but it's great, actually. Apparently the longer, the better.
I found the fabric at Hancock, and it really spoke to me. It's a very thin, non-wonderful brocade, but I love the colors and the look. This actually shows the wrong side while it's being cut out. I'm underlining with a thicker satin lining fabric. Originally I thought I would do something along the lines of a car-wash skirt, as they are so current, and finally wearable now that they're not being shown only with absolutely nothing underneath them. However, I like what I have come up with even better. I extended the underlining about 5" below the brocade and then turned it to the outside and asymmetrically attached it. Here's a photo of it on the dressform with the hem pinned. I am pinning a draped effect from the left waist to the right shoulder and I think the bow will be staying, but you never know.
Sunday, July 06, 2014
Versatile Tee Pattern - FSG 1960 Part 1: Dress
Most of you probably know that my favorite TNT Tee pattern is Nancy Erickson's FSG #1960. I've made it numerous times with lots of different style changes from turtleneck to huge cowlneck, deep scoop, collared scoopneck, and so on. I've done sleeves from long to 3/4 to elbow to sleeveless. They're all good because I have the base tee pattern just the way I want it, which includes a bust dart and a CB seam to allow for a swayback alteration. As you can see, this time I did something really different. A dress.
The top part is a very thin burnout knit with ribs although I wouldn't really call it ribbed. There's more textural interest than mechanical stretch from them. I got this in Chicago I believe, at Vogue Fabrics. The skirt and sash are a printed knit from JoAnn's. I was thrilled to find something that went so well with the bright cherry of the burnout, and it has kind of a Monet feel to it, I think. Since the burnout is so much lighter than the print, I steeled myself for some trouble when I stitched the top/skirt joining seam. Amazingly enough, it sailed through the machine like butter. I think my Pfaff IDF helped of course, but I think some of it was just due to good fabric, and maybe luck.
You can see in the photo where the dress is laid flat, that the top part is quite long. The sash is a double width of fabric, doubled into a wide tube, wrapped around twice and tied. It covers the join totally. The dress is wearable without the sash, and may get worn that way when it's really, really hot out.
I knew I wanted something different for the binding on the neckline and sleeves and that's when I went looking and found the printed knit and decided a skirt would be really nice. You can see a closeup of the binding (I used my favorite No Fail Binding method) and the twin-needle hem.
FSG#1960 |
FSG#1960 Flat |
You can see in the photo where the dress is laid flat, that the top part is quite long. The sash is a double width of fabric, doubled into a wide tube, wrapped around twice and tied. It covers the join totally. The dress is wearable without the sash, and may get worn that way when it's really, really hot out.
I knew I wanted something different for the binding on the neckline and sleeves and that's when I went looking and found the printed knit and decided a skirt would be really nice. You can see a closeup of the binding (I used my favorite No Fail Binding method) and the twin-needle hem.
FSG#1960 Neck Binding |
FSG#1960 Twin-Needle Hem |
Marfy Scuba Dress
I've been doing more sewing than blogging lately, which is probably a very good thing. I fell in love with Marfy 3507, and decided I had to make it in a neoprene/scuba fabric. I wanted a print rather than just a plain color and I found an unusual gray floral print at Elliott Berman Textiles.
I'm not usually a floral person unless it's large and somewhat abstract, and this was small/medium and very traditional. The style is traditional as well, a coat dress, but the zippers definitely update it. I did a lot of alteration, and ended up making a trial garment which I didn't hem but is otherwise finished, out of a heavy dark green knit. I adjusted the front waist size smaller and went on to begin anew with the neoprene.
I was pleasantly surprised to find that the fabric was a dream to sew. It's got body galore, and pretty much did whatever I wanted it to. No ravelling, no 'squirming' around, it just stayed put. It did require understitching on the collar and front edges. I used Pam's Pro-Tricot Fusible Interfacing on the collar and the lapel point areas, and that was all the interfacing it needed.
You can probably see that I used some interesting zippers for this dress. These are Coats & Clark's Cutwork Zippers and they were very easy to apply. The only problem I had was that they only came in 2 sizes, 7" and 22".
I ended up using the 7" zippers instead of flaps for the faux pockets. They worked perfectly.
However, the 22" zipper was too short to be both as high as I needed it at the neckline and as low as it needed to go on the skirt hem to make the dress really wearable. So, I took another zipper and installed it from the bottom up, stitching the lower one over the upper when I got to the join. It's not really noticeable when worn, especially with the somewhat busy fabric. I like to have it unzipped from the bottom for a few inches for walking ease.
The dress fits like a glove and is very comfortable, if also really, really warm to wear. It will be a great winter dress, although as soon as we were done with the photos, I knew I wouldn't be wearing these shoes with it.
The color is not good on the side view, but I thought the shaping was important to see. I think this is a great basic pattern and it would be very easy to add a buttonhole extension to it, although the zippers are fun. Once the alteration work has been done, I like to reuse a pattern if I can.
Tuesday, April 15, 2014
Pattern Work
Thanks to becki-c, I now have the correct pattern illustration, too!
Thursday, January 09, 2014
Mermaid Gown
I have been working on this gown for quite some time, since I wasn't in any hurry and didn't have any place to wear it particularly. When the 90th Anniversary Banquet for my Mu Phi Epsilon alumni chapter came up, I knew I had to finish it.
The fabric is a mint/dull-red cross-dyed stretch velvet which was a gift from my dear friend Patti. In the photos it shows as much more red than it does in person, I think because of the flash, but it is very changeable, and a lovely fabric. She bought it and later realized that it wasn't her colors. However, it IS my colors, and she was kind enough to let me have it. I didn't have any plan for it originally, and thought it might become a nice, snuggly winter top. And in fact, I was holding it up in front of the mirror last winter to see what style might be good when I draped it around myself and realized that it wanted to be an evening gown.
I have long been an adherent to the theory that you can't just pin a length of fabric around yourself and stitch it up as is, with no underpinnings, and have it look good once you're past about 18-20 years old. I was shocked when I did just that with this fabric. It was almost magic, the way everything just worked as if it was meant to be. I don't expect to ever have it happen again. I simply tacked it where I had pinned it, and didn't even cut at all. Since the inside is a dull red, it makes a great contrast to the mint/sage green and red of the right side, and I used that contrast for the turn-over at the top. The slit in the skirt shows both sides as well.
The only interior 'work' I did was to add a grosgrain waist stay that is attached at the point where the waist drape twists. With all the skirt fabric hanging from that point, it became heavy enough to sag after I added the beading, and the stay holds everything in place. I wasn't uncomfortable once during the evening, or nervous that my dress was going to move out of place.
The beading was fun, and I just started in without any great plan other than an idea of what I wanted it to look like when I was done, and added more and more, and after the Kenneth King Weekend, I added silk ribbon embroidery and even more beads and some cording and strung beads that hang from the waist drape.
The shawl is a piece of silk chiffon embroidered with starfish (appropriate for a mermaid gown?) that I purchased from eQuilter several years ago. It's simply hemmed on the ends, and uses the selvedges for the other edges. It turned out to be the perfect colors to go with this, and just what I needed.
Tuesday, September 11, 2012
Pleather Costume Dress & Garter Belt
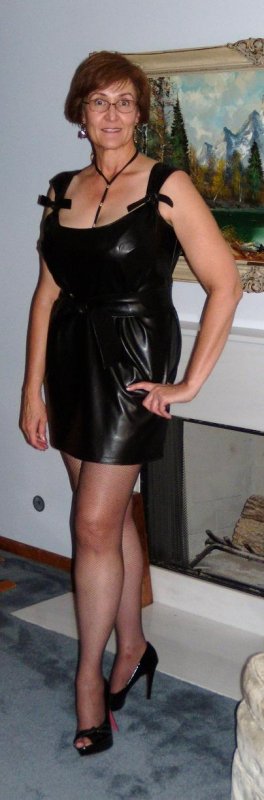
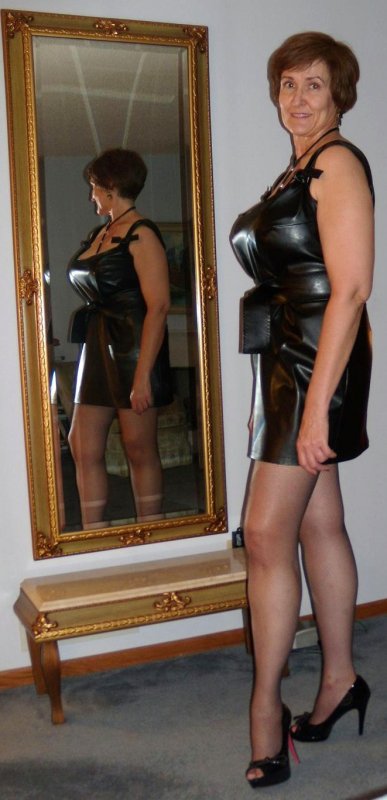
I needed a costume for a party in August, and decided this homage to Emma Peel of the original Avengers would be fun. I'm not sure Mrs. Peel ever wore anything exactly like this, but surely something very similar in spirit. After all, it was the Mod 1960's.
This dress is made from Pleather from JoAnn's.
I used a Marfy sheath pattern (#1128) as my starting point, with some changes that are not really too drastic design-wise, although the look is quite different from the original here and here.
I've made this dress several times, and it's a very versatile pattern. This iteration has been shortened, the neck scooped, the back neckline changed to a very deep Vee, and the side zipper exchanged for a below-the-waist CB separating sport zipper.
You can see the back below. For ease of fitting, etc., and since it's only a costume, I decided that leaving the Vee open to the top of the zipper and exposing the back strap of my bra would not be a problem. It would be easy enough to put a modesty strip or panel across with snaps, and if I wear it again, I may do so.
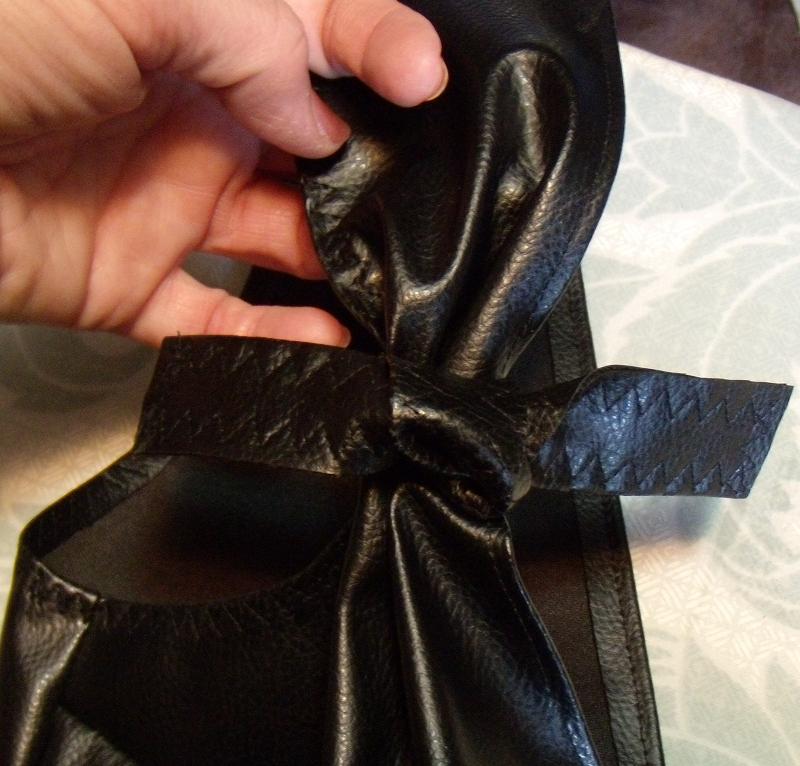
The pleather was very easy to sew, but the fact that pins make permanent holes made it difficult to fit quickly. Tape didn't hold well to try things, and I ended up using clothespins at times. I did use some pins where I was going to be sewing anyway. All edges except the hem are turned and stitched with either a straight stitch or a 3-step zigzag. You can see both in the photo at left, which shows the ties on the front shoulder 'straps'. They control excess fullness in the neckline.
The original design has a front jewel neckline with gathers in lieu of some of the dart shaping, and I should have rotated that fullness out before cutting. This did the trick though, and is kind of cute anyway.
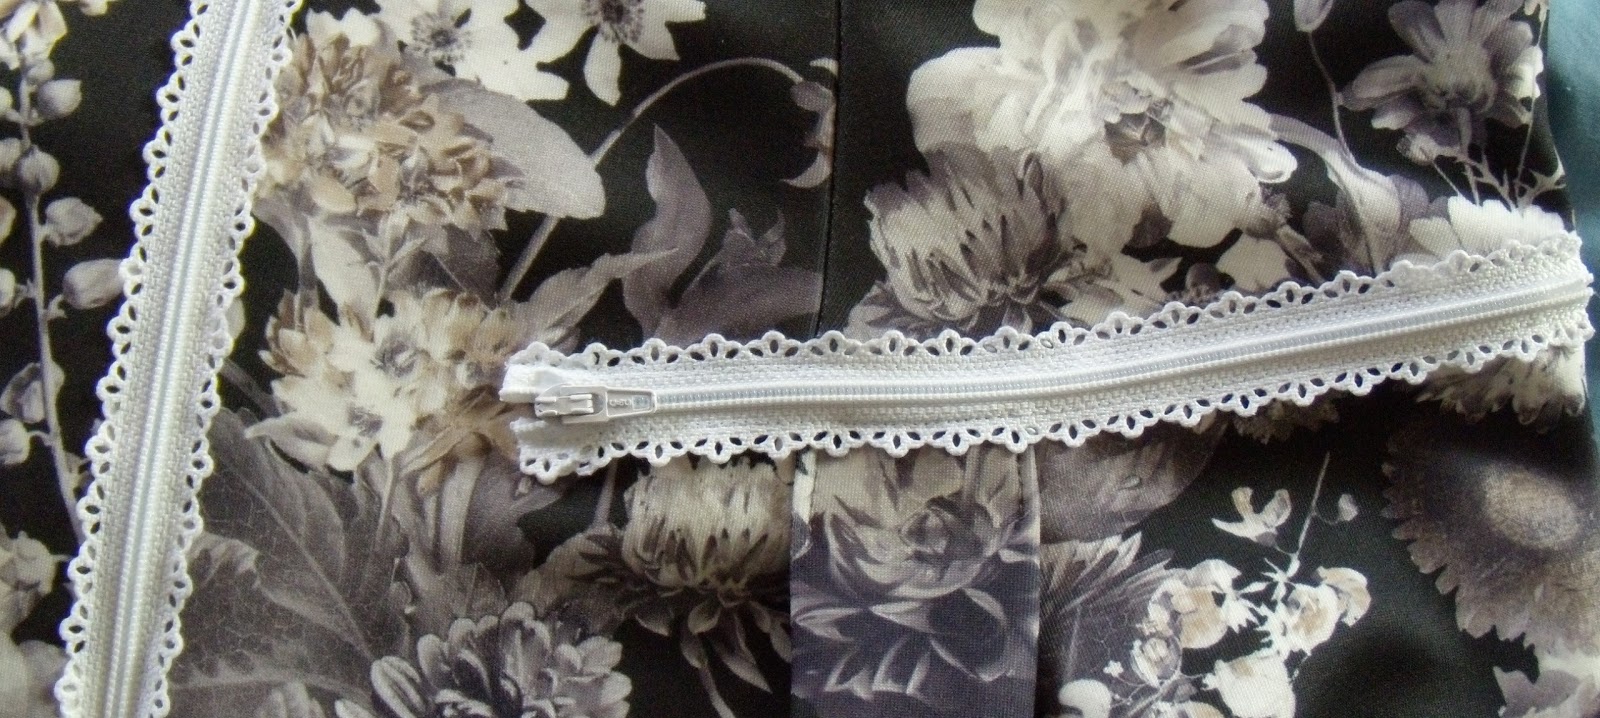
To the right is the back of the dress laid out on the ironing board. You can see the zipper at CB. The zipper zips up from the bottom.
You can see the bottom of the zipper below and the double row topstitched hem from both the inside and outside of the garment. The hem was turned up and stitched along the zipper while the zipper was inserted.
I used a large-toothed sport zipper for this garment, and I think it fits well with the design and the fabric.
To the right you can see the CF waistline from the inside and outside of the dress. I took a tuck at the waistline between the front vertical darts. There is no give in pleather, and there was just too much fullness there.
I put elastic inside to gather it up across the grain a little as well. This seemed to help the fit quite a bit, and it was all hidden by the sash belt.
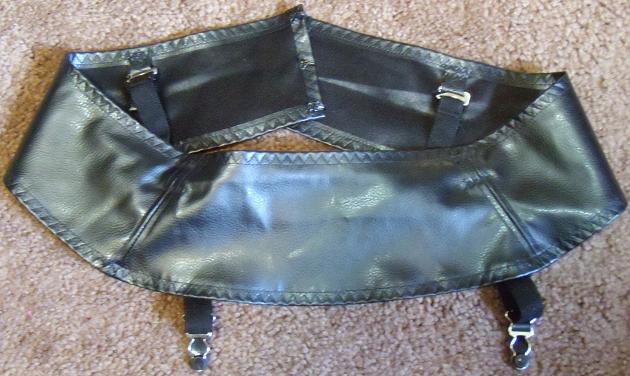
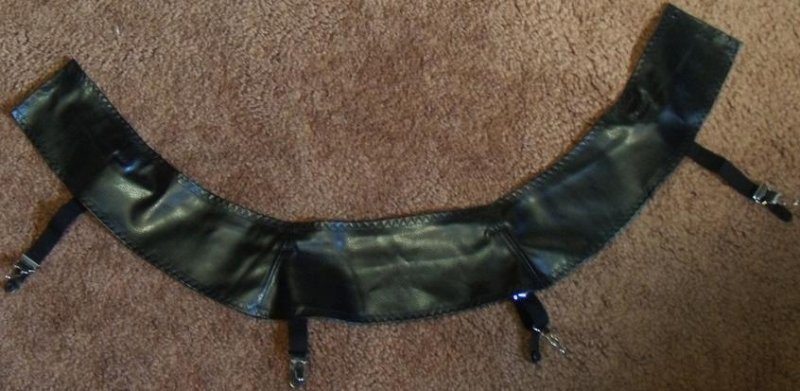
On to the matching garter belt. Every 1960's heroine needs a garter belt. After all, it was before pantyhose made their appearance. Here it is closed and open.
The pleather made it very quick and easy to sew. Sturdiness, no raveling and no stretch meant no reinforcement or lining needed. This sped up the process a lot. I used purchased garters which came with the elastic attached, and put loops with 2 attachment points on the inside.
The seams were stitched, then each seam allowance was topstitched down. This might have been overkill, but I wanted it to last, and to be very flat against the skin. I used the triple zigzag on the edges, again to make sure the edges were very flat. I had thought it would be fun to add some embroidery or some kind of embellishment to this, but I ran out of time.
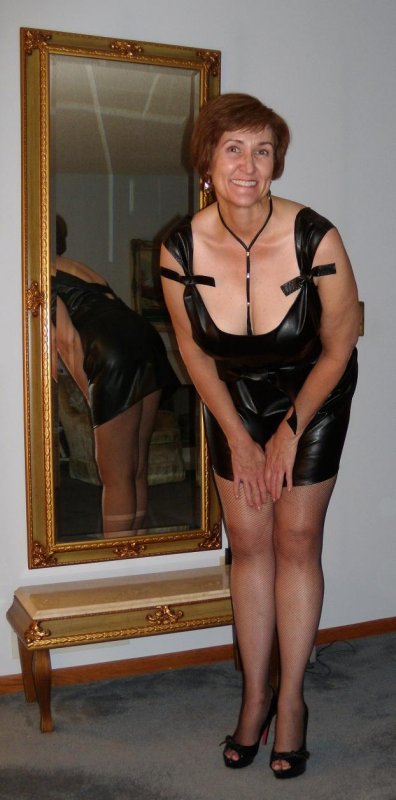
I will leave you with 2 last dress photos. The side/back view, and the 'fun' shot. Many of you know that my sister takes all my best photos, and we were getting silly at this point.
Subscribe to:
Posts (Atom)