Tuesday, December 30, 2008

Coat Buttons

I finished my coat on Saturday night, except for the buttons and buttonholes. I had determined that I wanted to do hand buttonholes, and I'd tried to choose buttons some time ago with a swatch of fabric, but I just couldn't decide, and so I waited until I could take the coat with me to the button shops. I knew I wanted something rather unique, but which didn't take attention away from the entire garment, but complimented it. It was also hard to be sure of the right size until I could see them on the coat


Photo Link

I am very pleased and rather surprised with my choice. I actually had two of these buttons already, and had thought I liked them a lot with this. Of course I had no idea where I had found them, or even when I had bought them. Amazingly, there they were at Sew Creative, so I bought two more. I will have to get an extra next time I'm there, but I thought I had three at home, so only bought two more.

I think these look a little like Jules Verne flywheels or something. Very engineered, anyway. I also bought another set of buttons just in case, but these were definitely it.

I have 2 of the buttonholes done at this point, and will finish the final two tomorrow I hope. So far, I'm really pleased with the coat, and I can't wait to show it off in its completed state.

Thursday, December 25, 2008

Coat Progress 3


Photo Link

This is the collar edge, showing the hand topstitching I've been doing. I wanted it to look somewhat like saddle stitching, although it's kind of a hybrid between prickstitch and backstitch. I've done this around the pockets, flaps, collar and on both front edges. I used 2 strands of Mettler's Silk-finish Cotton thread.

Here is the way I did the stitching if you're interested. Pull out a very long length of thread, double it and thread your needle with both ends. Tie a knot in those two ends. This ensures that when you want to go back a stitch or two to correct things, as you will, you can just unthread your needle, pull out the stitching and re-thread.

I stitched right to left. Come up with your thread a stitch-length to the left of where you want to begin. Insert your needle to the right, at your desired starting point. Come up again a stitch length to the left of your first stitch. Continue this way until you're done. This allows for fairly long stitch lengths, which is what I wanted, while still doing the work of an edge stitch even though the stitch is long and fairly loose so that the stitching won't disappear in the pile of the fabric.

It's easy to keep your line straight by using your thread and needle as a guide. Make sure you've inserted your needle so that you're going straight before you push it all the way through and up again. Use a needle that's at least an inch and a half long for this so you can line it up with the stitching you've already done. Too short a needle is not the thing for this, at least with fabric this thick. You can also hold the length of the thread out ahead of your work to judge where you're going, especially on angles or curves.

Here's my coat as it is right now, hemmed, unlined, sleeve hems pinned, and the coat pinned closed at the neck only. I still need to find buttons I like. That will be my after Christmas project.


Photo Link

I have the lining just about ready to go in now, and I'm having such fun working with the silk charmeuse. My new Pfaff sews it just like a dream. I tried a 1.5mm stitch length, as promoted by Linda Lee, and it looks gorgeous. I can hardly wait to sew something else with charmeuse. It's been a long time since I did anything with it but line jackets.

Merry Christmas to All

I don't usually do holiday posts, but I found this poem at The Real Muck, and thought you all might enjoy it too.


Reflection on Imperfection

‘Tis the season for unreason

when green spills from wallets

of those believing in traditional pleasing.

‘Tis the season when people pine for a fine Christmas tree—

white pine, balsam fir, white spruce, Fraser fir, Douglas fir, scotch pine,

whatever...

but it must be a wintergreen, evergreen, ever-perfect, perfectly-shaped

Barbie bush.


In the nippy air, hundreds of Barbies form green lines

with straight spines, very vertical trunks, ample branches

each with a single perfectly-pointed top

waiting for its traditional spot up the

angel’s ...tush.

Partly hidden ornaments adorn lush limbs,

shiny balls peer from green mazes

and candy canes lavish properly perky

branch tips.


But Barbie’s lavish bushy branches

leave little room for ornaments

lest adornments detract from her own

flawless beauty.


***


I wander far and wide, bucking the tide

wondering why I must settle for popular perception.

I search for Barbie’s ugly cousin,

a form, a shape that doesn’t fit the mold,

flat-chested for small house

spaces.

It’s the wind-blown hair, the hole in the sock, the scrape on the knee, the spaghetti stain on the shirt, the pimple on the nose that tell a story

of living.

I like a crooked smile, spaces between teeth, scraggly hair, spindly legs

and skinny arms that reach out

open to discovery.

I want a tree that doesn’t hide,

that opens wide to embrace pride

held in accessories’ histories, their stories and the

love they imply.

I seek a spindly tree, the ugly factor with character,

one willing to show open spaces,

places for treasured ornaments grown dear over the years...

those that have lost their shine, are ragged from playful cats, have missing parts, the hippo of bedtime stories, an apple from a student, a violin recalling cacophonous practice, clothes-pin soldiers formed by tiny hands, hummingbirds like ones covering a morning field years ago in the Grand Canyon, a plastic dog a reminder of a lost pet, baby’s first Christmas 25-years ago, grandmother’s crocheted hobbyhorse and mouse, eloquent velvet-covered and pearl-studded balls made by a nearly blind friend long gone.

And then I see it—the orphan cousin in a heap

apart from the collection,

far from customers’ inspection.

I reflect on its simple beauty.

Missing branches leave

room for us.

I like my new bare and slightly crooked tree,

I like the way you hang your hand-painted sand dollar next to my beaded bird.

It is in the spaces where

we hang our love.

Perfection isn’t about shape and complexion.

Perfection lies in connections...

how we create them,

how we fill in and connect those spaces

that life gives us.

________________________________________________
________________________________________________


I don't know who wrote it if not the blog author, so I can't give a citation, but it struck a chord with me.

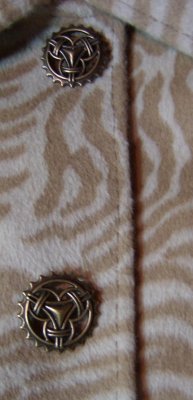
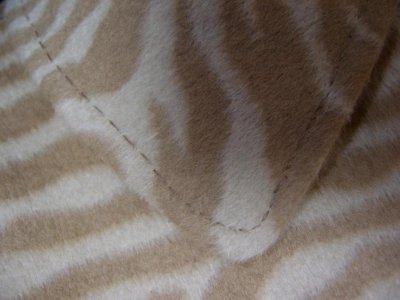
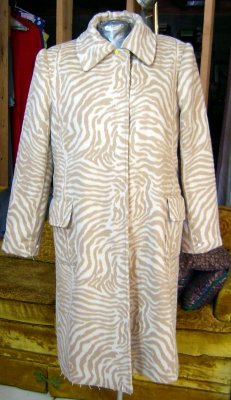
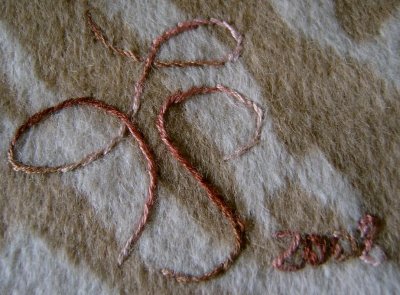
Back to sewing, I'm still working on my coat, and it's coming along. The sleeves finally went in nicely, and it's hemmed, so I'm about ready to finish cutting the lining and put that in, and then I believe that will be it! Sounds fast, but I don't seem to be moving very fast lately. I am enjoying doing it, though.

Hope you all are having a lovely holiday, and that you got all your Christmas sewing done on time.

Wednesday, December 10, 2008

Pocket Lining

NancyK asked for a little more info on my pocket lining method, saying it was different than she'd done before. I have to say that it's different than what I've done before, too.

You can see photos of the pocket lining in the previous post.

I'm planning to use Marji's patch pocket attachment method for these. It consists of constructing your pockets completely and then hand stitching them to the coat from the inside of the front pieces. So, I cut my coat fabric, attached sew-in interfacing cut to the exact pocket dimensions, pressed up the hems and edges and basted. I then topstitched by hand, using doubled thread (Mettler Silk-Finish Cotton) to look (I hope) like saddle stitching. I could have done a regular faced-pocket method of stitching the lining to the fabric RST and turning, but I remembered reading an article by Claire Schaeffer about telling a fake Chanel from a real Chanel and one of the things she mentioned was that the topstitching did not go through the lining. Silly me, but it stuck in my head and I thought "I can do that", so I did.

I pressed the hem edge of the lining first, then laid it on top of the WS of the completed pocket. I then turned the other edges under to fit, and pinned it. I did the whipstitching first, then just stitched invisibly (ladder stitch?) for the other edges. The lining doesn't go clear to the edges, which is hard to see from the photos in the last post. The main thing was making sure I wasn't pulling the lining too tightly. It needed just a little room to make the pockets lie perfectly flat.

I'm sure there are better and certainly faster methods, but this is what came to me.

Monogram and Pockets


Photo Link
I wanted to add some special touches to my coat, and a nice interior monogram is one of them. This will be appliquéd to the lining. I tried various threads and embroidery flosses and was a little surprised that I liked this variegated floss the best. It's a DMC linen floss. I'm also using it for a nice edge finish on the lining.


Photo Link
Here are the pockets and flaps after topstitching, but before lining.


Photo Link
Here's the inside of one set of lined pocket and flap. You can see the lining edge treatment, with a close-up below. It's just a whipstitch, but I think it gives it a pretty, corded effect.


Photo Link

Thanks to all of you that commented on my steam generator. I like it very much, and I did end up doing a pretty widespread re-do of my sewing area because of it. That was a good thing too. I have a better working arrangement now I think.

Friday, December 05, 2008

Ironing Is Exciting Now


Yes, I got my new iron, which is a Rowenta Steam Generator. So far, I'm very pleased with it, and the amount of steam it puts out is pretty amazing. It's making me re-think my sewing area arrangement though. I think I need to put a table next to the window for the iron, and for the cat to sit on and look out the window. Right now, he sits on the ironing board, and I have a special elasticized cover on the board for him. I remove it when I want to iron. I've kept my iron on the floor for some time since I don't want him to knock it off, and the feeling is stronger now, but it would be nice not to have to pick it up and put it down when I want to use it. I think he'd prefer a table too, if I can find something the right height. No rush on this, but I think it would be nice to move things around a little.


I decided to make a quick pair of pants to test things out. I desperately need some very casual pants, not least because my only pair of jeans is biting the dust pretty quickly. They're actually a pair of my regular Burda pants, but in denim. The zipper pull broke off the other day when they were almost zipped up, and I managed to get them zipped the rest of the way, but when I needed to unzip them the next time, it wouldn't budge. I ended up working on them with a pliers while I was wearing them. Not good, but I did manage to get them off. So, I first replaced the zipper in them, since even if they're not too whippy anymore they're perfect for times when I know I'm going to get dirty.

When I had replaced the zipper, I moved on to the casual pants. I used a green poly/cotton bottomweight fabric in a small windowpane check, and my usual pattern. I suppose I'd better plan on replacing the jeans pretty quickly, too. It's hard to get along without them, especially in the winter.
Posted by Picasa